Electric underfloor tile floors: the pros and cons
Electric floor heating - it is comfortable and practical, especially if it is laid under the floor tile.
Special features
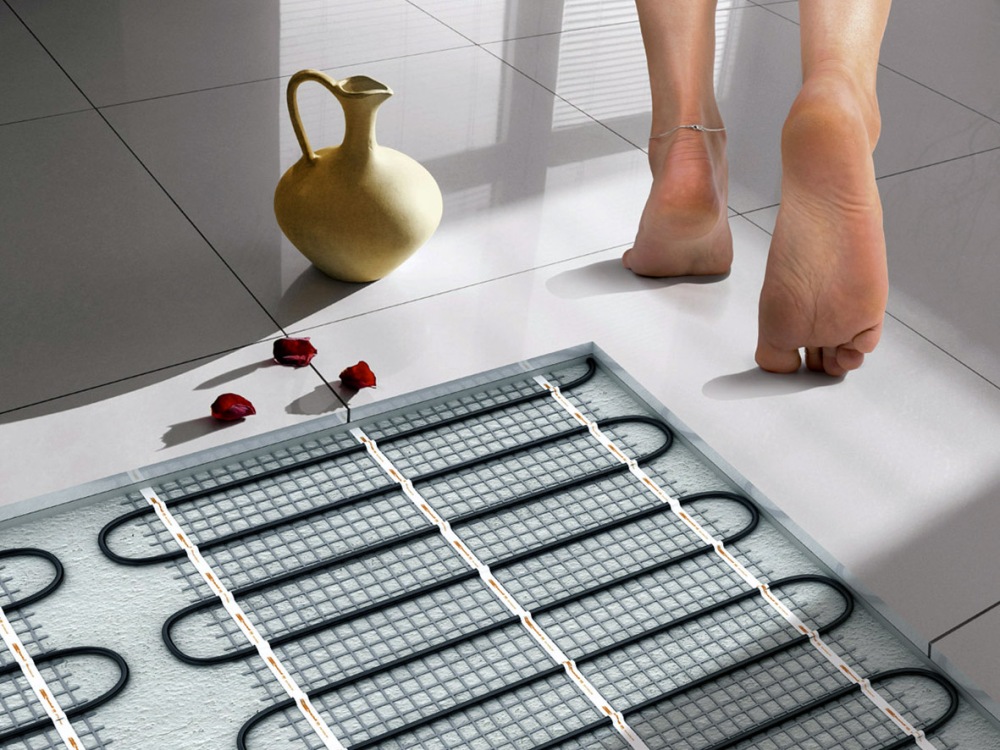
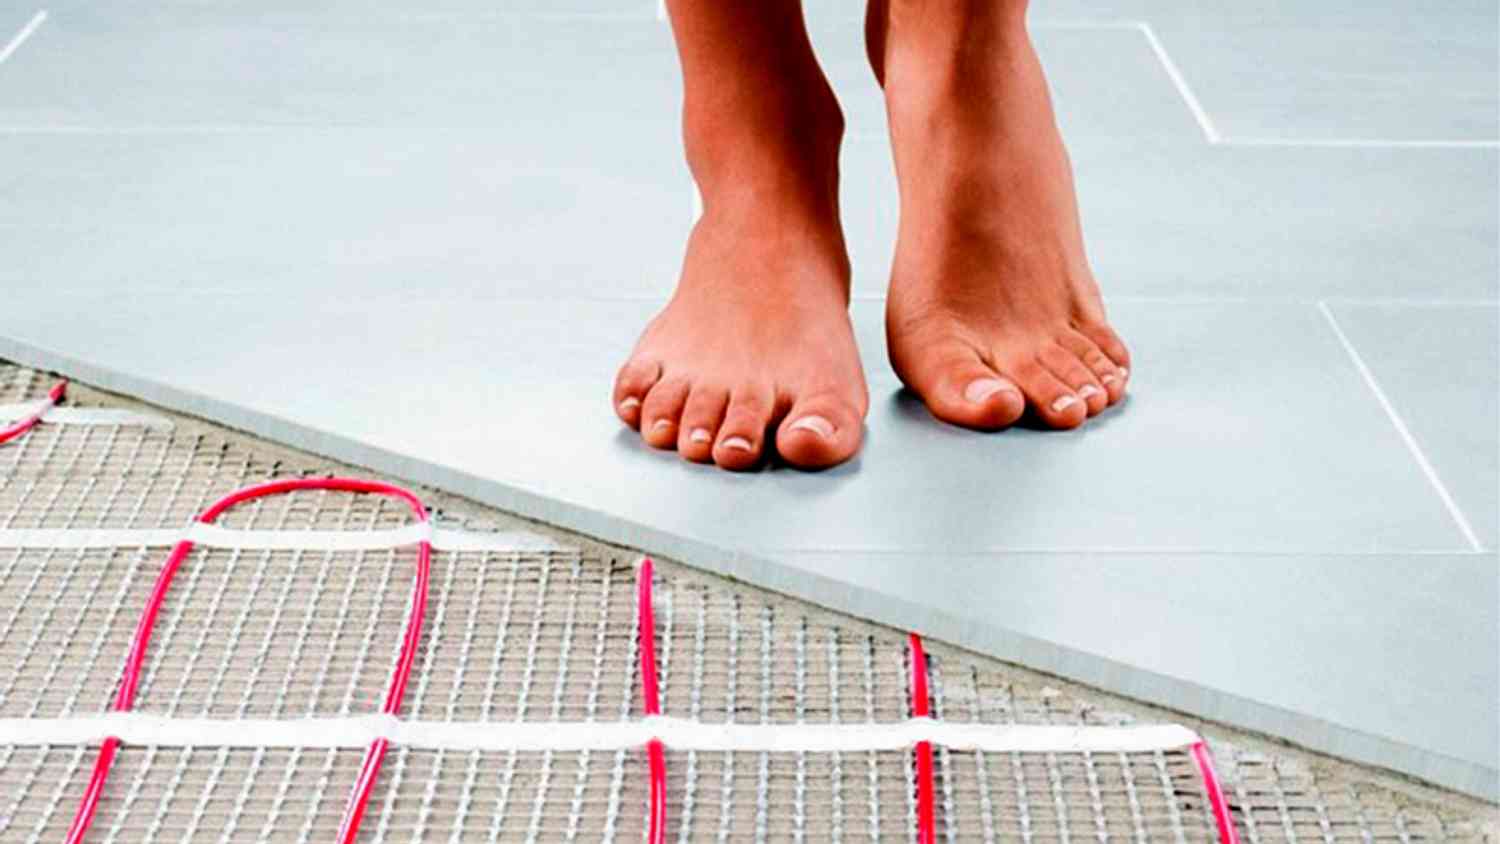
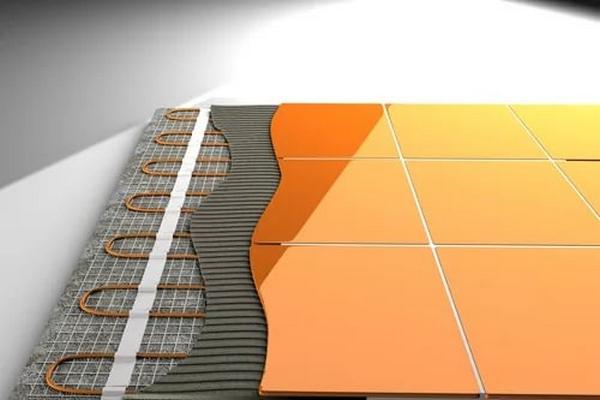
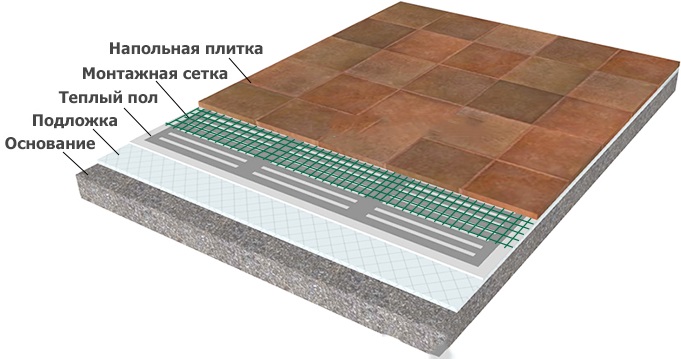
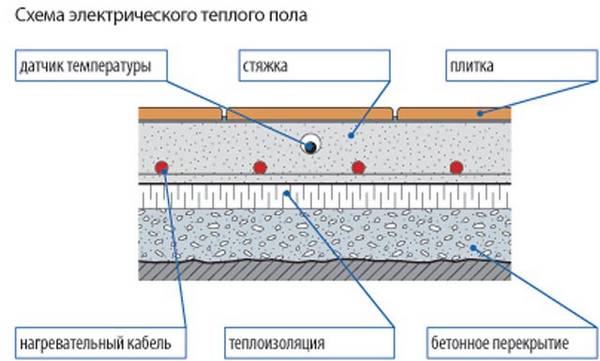
If earlier the floor tile was considered to be a cold coating, then with the advent of the underfloor heating system this problem is eliminated. The device of innovative technology of heating allows to achieve uniform and regular heating of the room.
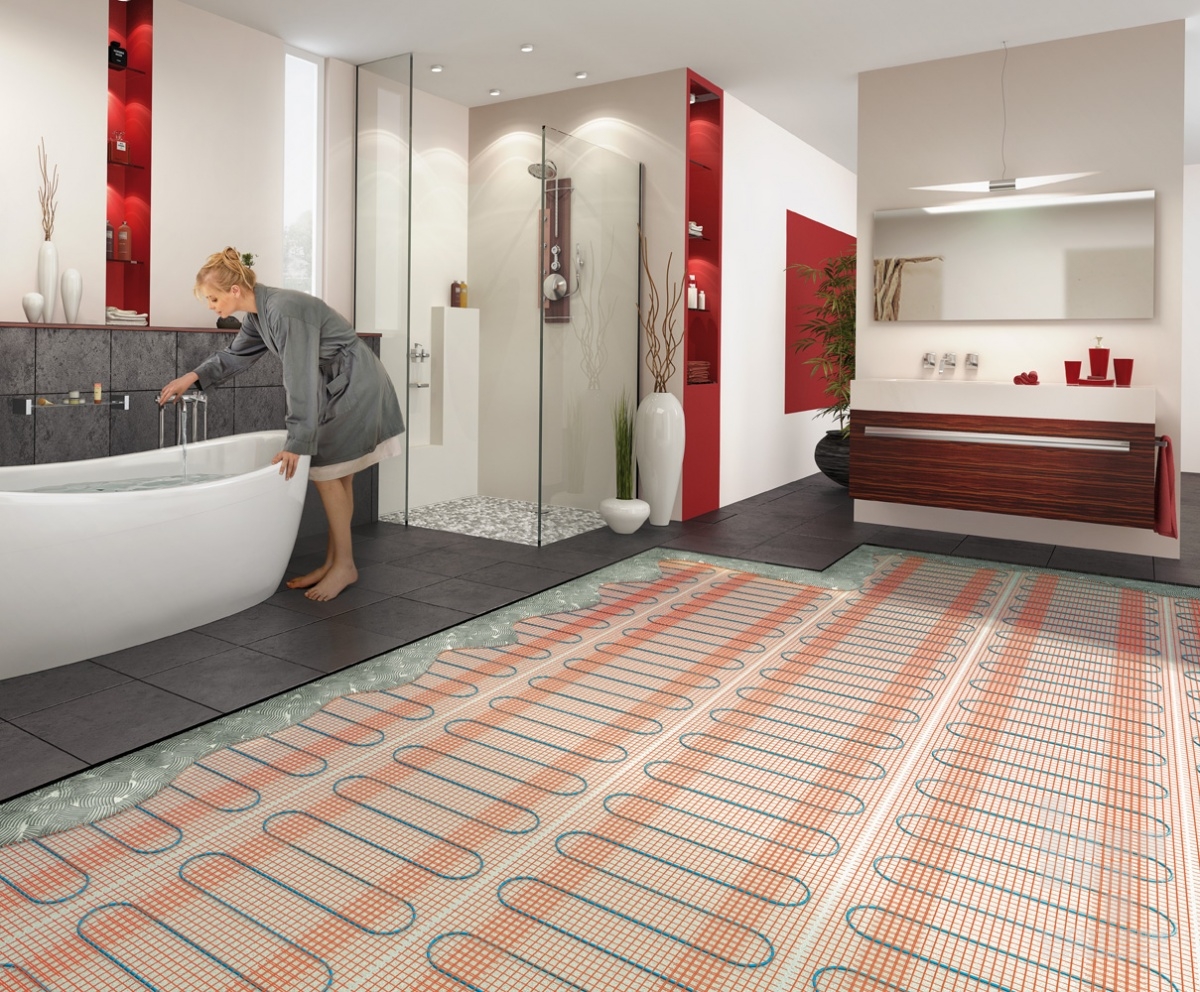
As a rule, the warm floor under the ceramic tile is laid in rooms with high humidity, for example, in the kitchen, bathroom, saunas, swimming pools. Thanks to the heating, the floor covering in the indicated rooms becomes comfortable and warm, even if walking on it barefoot.

By itself, floor tiles - a material that is resistant to moisture and mechanical abrasion. In conjunction with heating, it becomes even more functional and in demand.
Electric floor heating is one of the varieties of underfloor heating. There are also water heated floors, which are heated by water.This system is suitable only for private houses, because when it is used in an apartment building, there is a high probability of neighbors flooding from below, as well as interruptions in heating of neighboring apartments.
Advantages and disadvantages
Electric underfloor heating, in contrast to water, are becoming more common. This is due to the fact that they have several advantages:
- The advantage is their versatility: they are suitable for all types of premises;
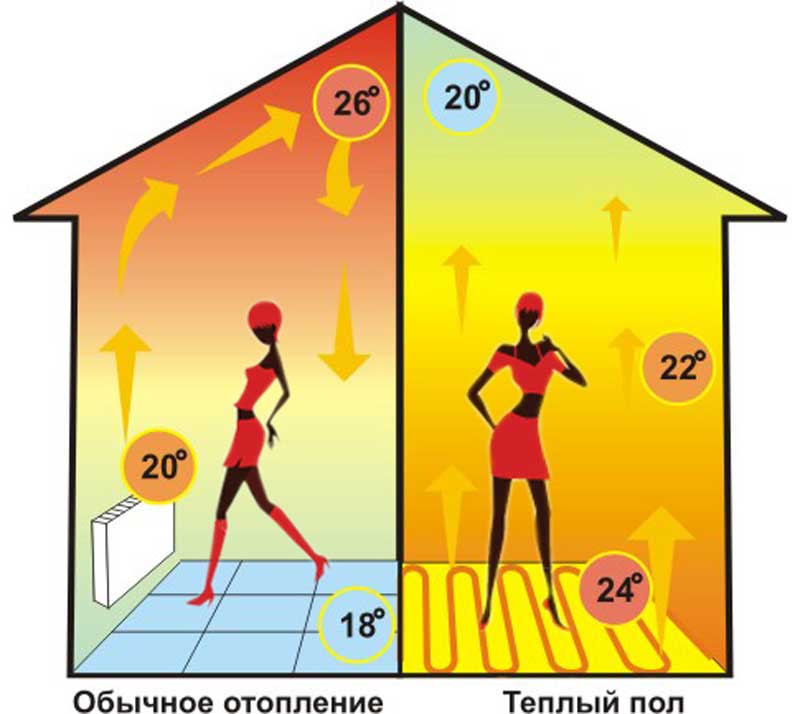
- The use of electric underfloor heating makes it possible to achieve the optimum temperature for indoor air health: at a distance of 20–30 cm from the floor, the temperature reaches a comfortable 24 degrees, while at the top it is 18–20 ° C;
- Heating with a heated floor does not lead to over-drying of the air in the room;
- Due to the presence of sensors and regulators, the temperature in the room may vary depending on the climatic conditions, the size of the room, the number of people in it;
- The electric heat-insulated floor, unlike water, does not create load of a structure. Water system involves the use of pipes for the circulation of water, which are laid in the floor screed and have a thickness of 10 cm.
- The long service life and the absence of annual maintenance requirements make the electric floor economical;
- In the event of a breakdown, it will be enough to remove the floor covering under a warm floor, so the repair will not require much time and financial costs.
- The variety of options for the electrical system allows you to choose the best option for each user.
The downside of the system is the increased power consumption. On average, for large space heating, 15-20 kW is required. These indicators significantly increase the cost of utilities.
We must not forget that all electric heaters can become a source of electric shock.
Electric floors require additional grounding and an emergency shutdown feature.
Kinds
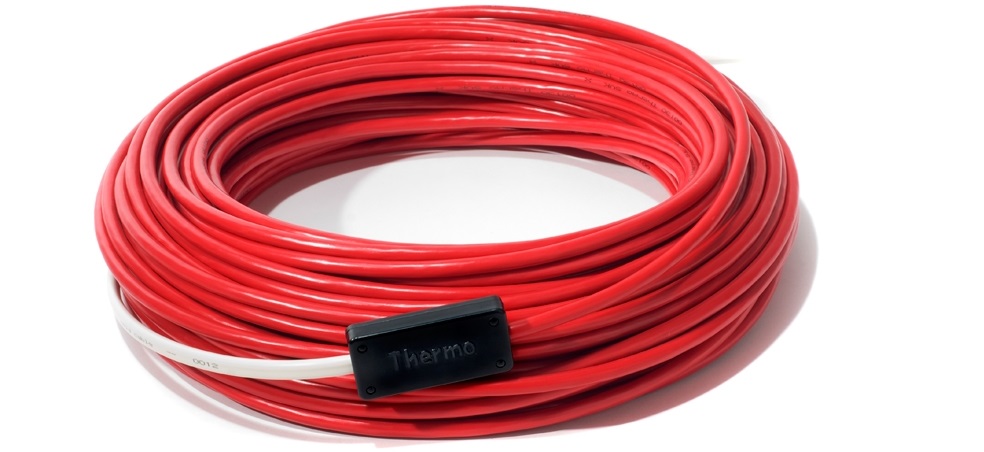
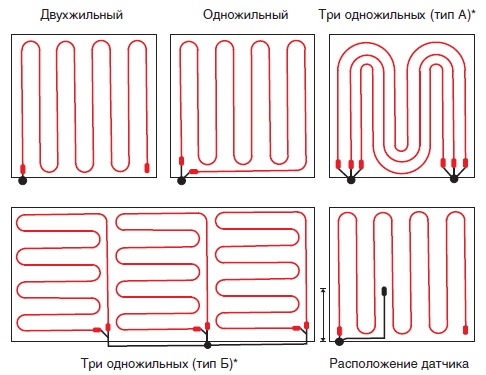
Electric floors are based on heating cables. which can be 2 types:
- Resistive, that is, generating heat evenly. There are single and two-core cables, all of them are characterized by constant resistance;
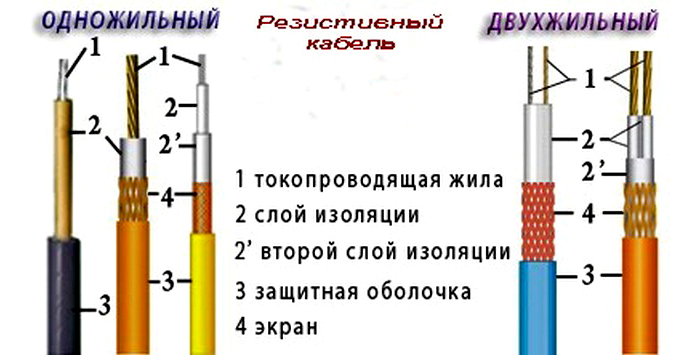
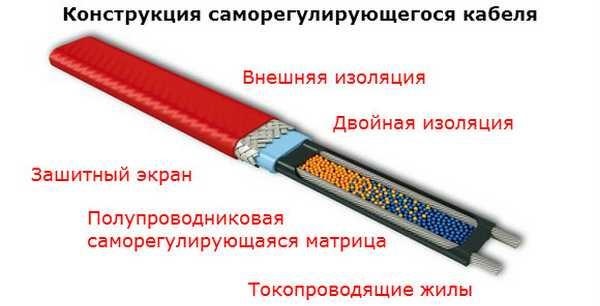
- Self regulatingwhich only happens to be strandedwhich almost completely eliminates the risk of overheating at certain points in the cable.
Depending on the systems used and the method of laying the electric floor is divided into the following types.
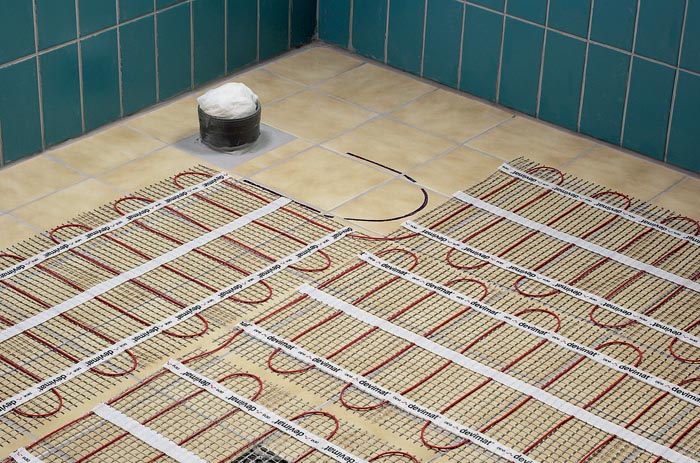
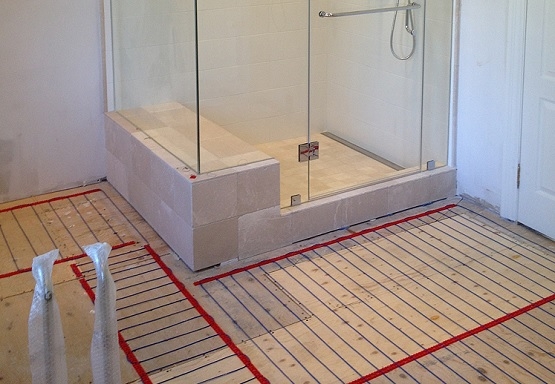
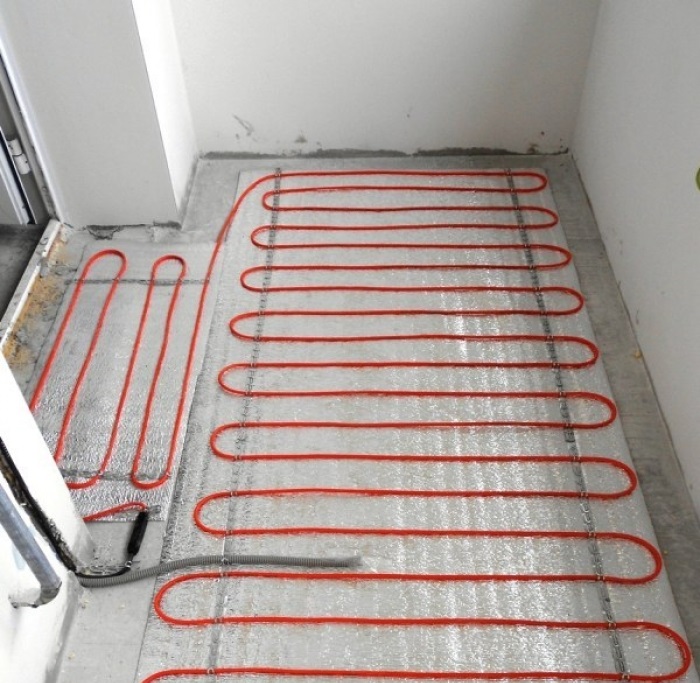
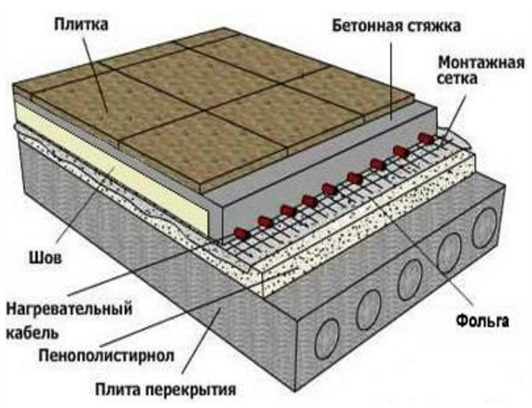
Cable
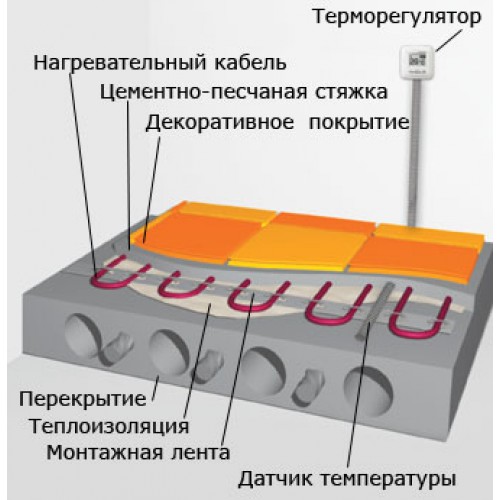
At the heart of the floor resistive (single or strong) or self-regulating cable. The first system usually has a thermostat, the second one has a self-regulation of temperature depending on the conditions of the room. For example, at a window and doors heating is more intensive, than the areas under furniture.
However, the natural non-uniformity of heating can be achieved even with the use of replacement cables, since during installation you can adjust the step of laying the heat cable. In areas where more heat is required, the cable is more tightly packed.
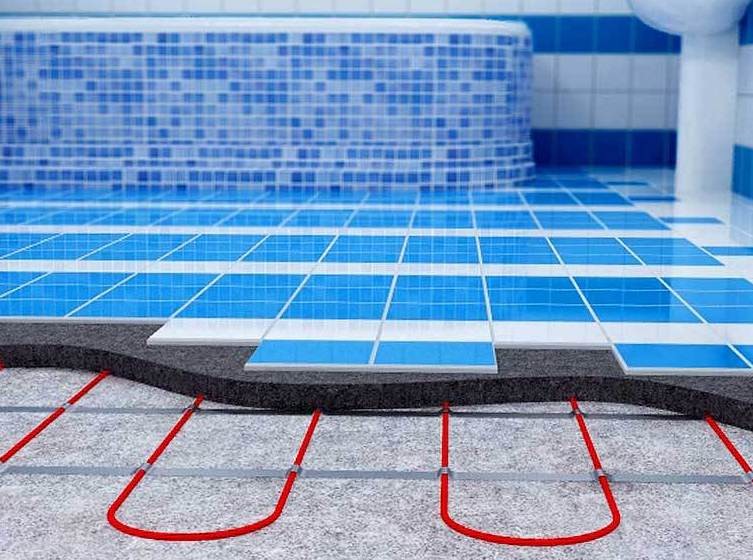
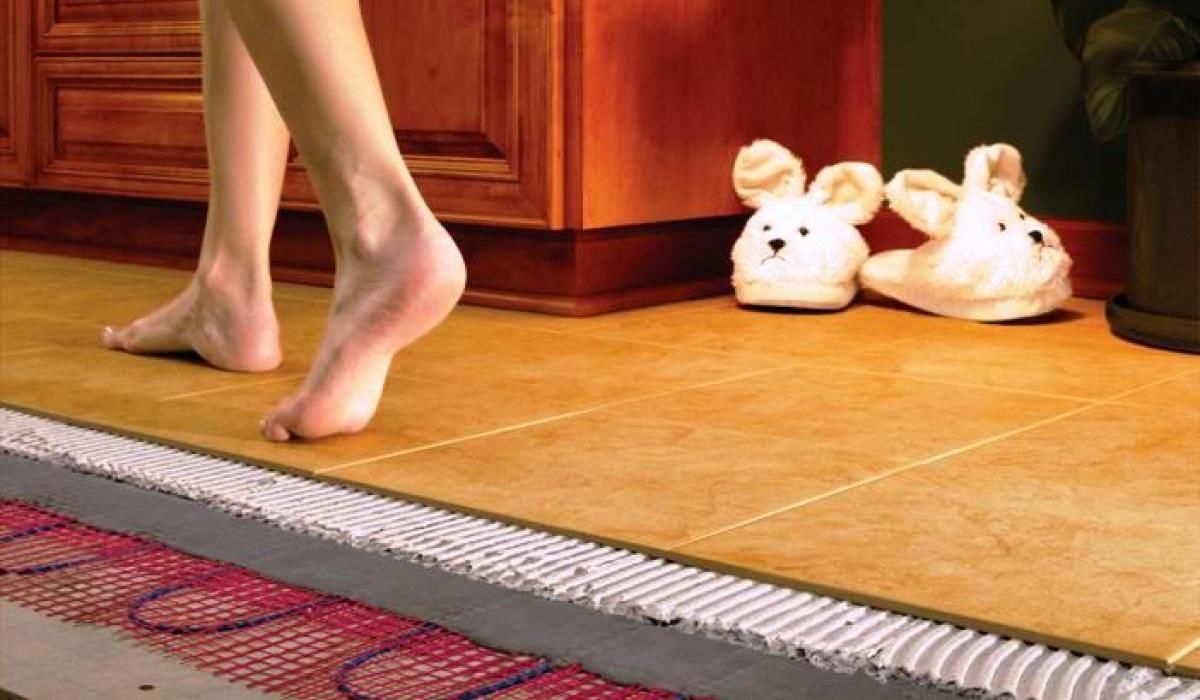
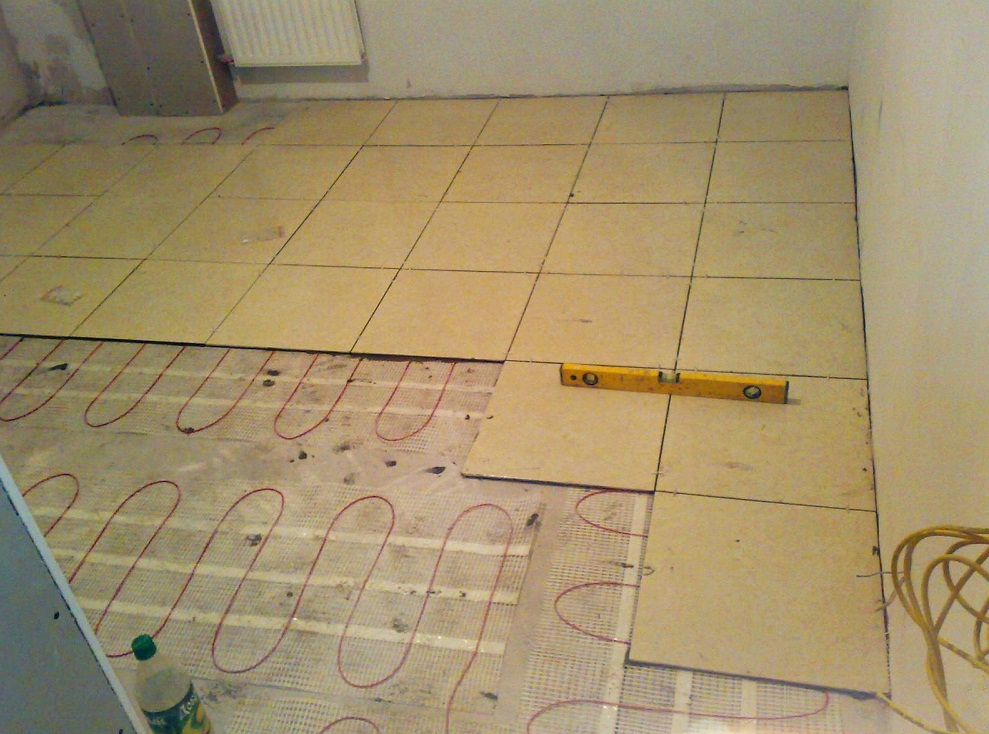
The cable jacket in such a system can withstand temperatures up to 70 ° C. The advantage of a cable heated floor is its good compatibility with tiles, as well as the efficiency of heating when turned on.
The disadvantages include the fact that it is not recommended for use in apartment buildings. This is due to the peculiarities of mounting the cable floor. It fits into a concrete screed, the height of which should be about 4 cm.Thus, after the installation of the heating system and the flooring, the height of the floor in the room rises by 5-6 cm. In addition, the load on the floor increases. Among the minuses of the cable floor can be noted the high power consumption and the complexity of self-installation.

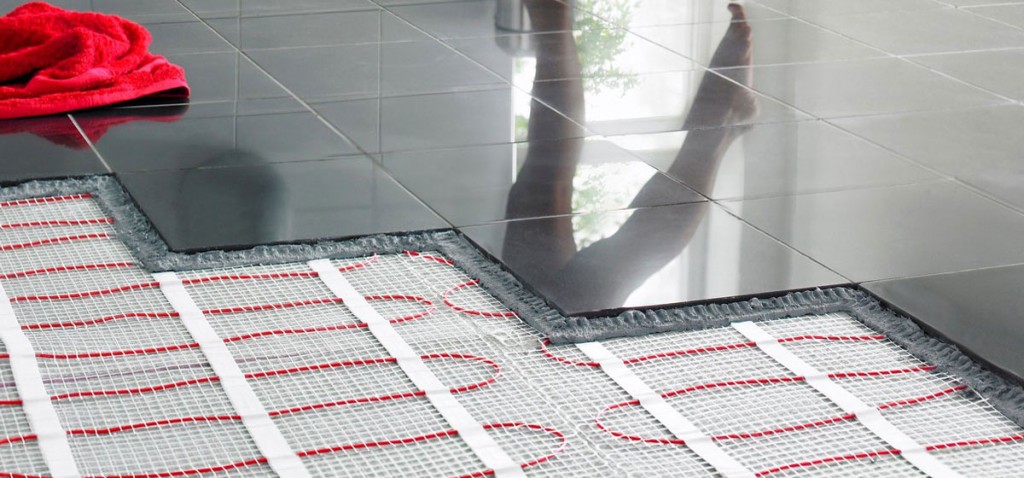
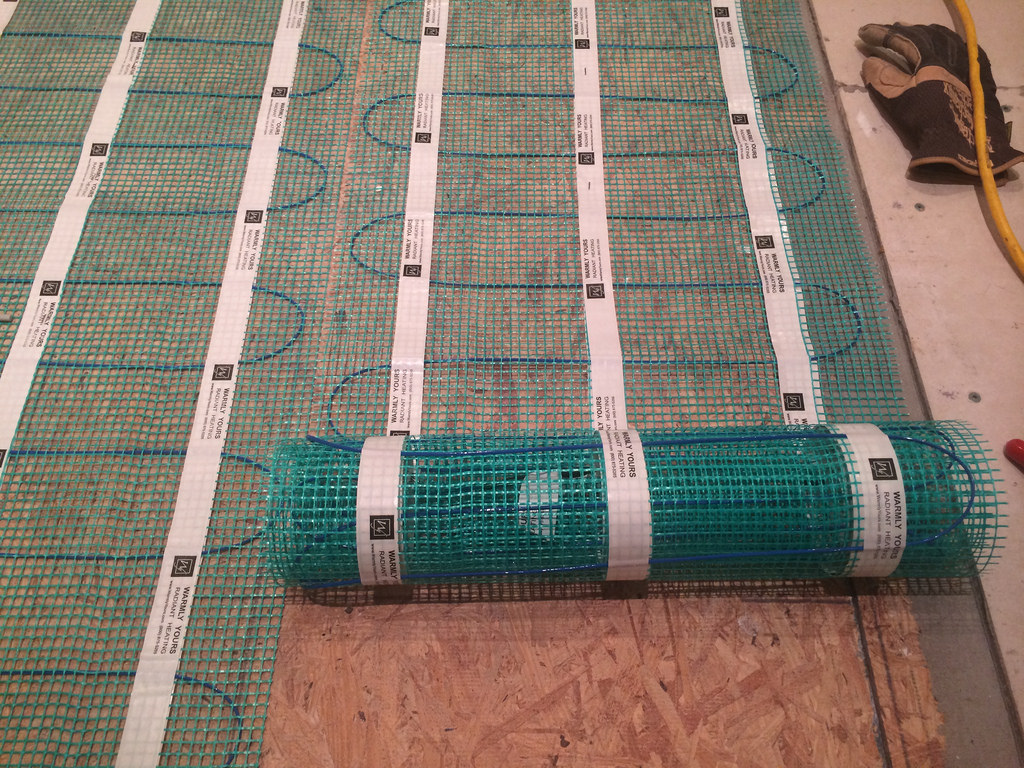
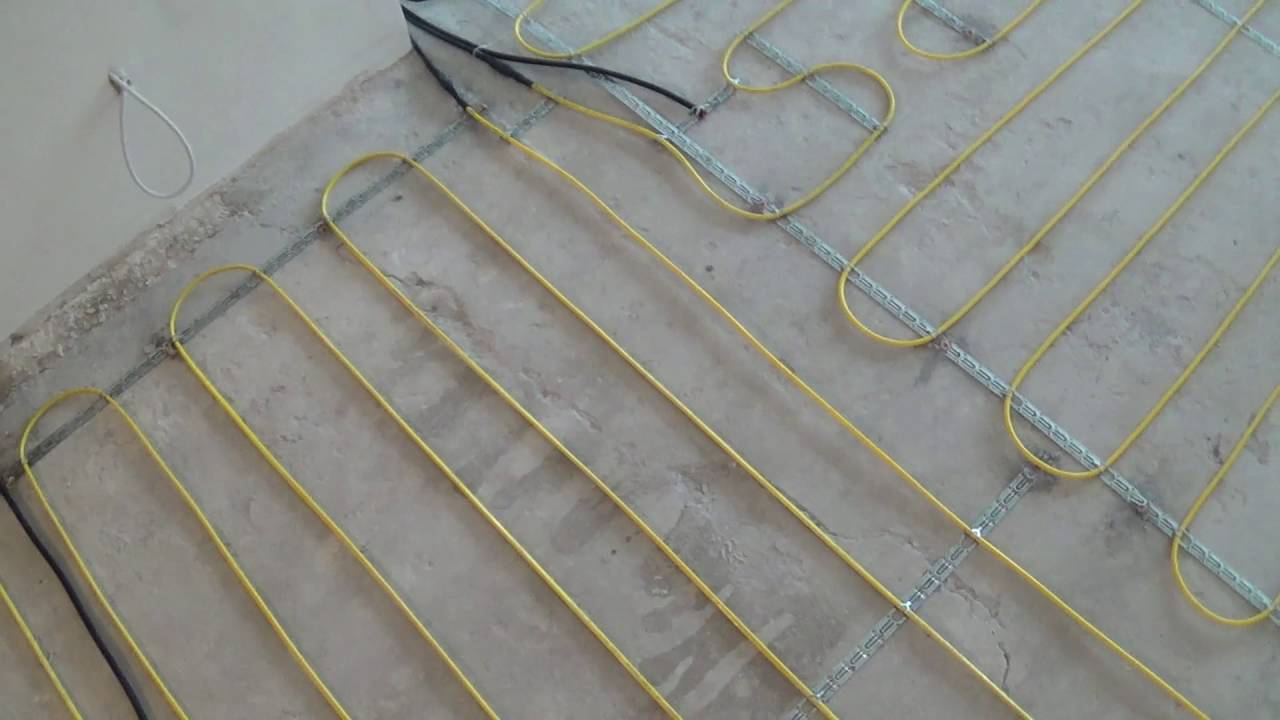
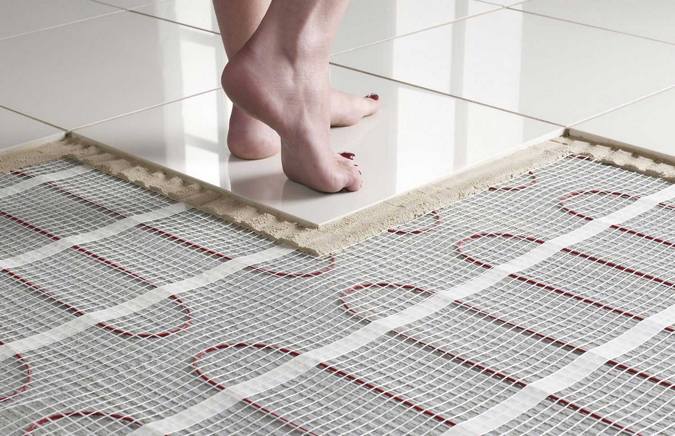
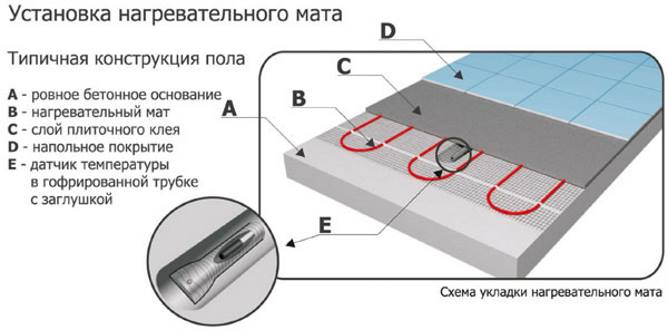
Heating mats
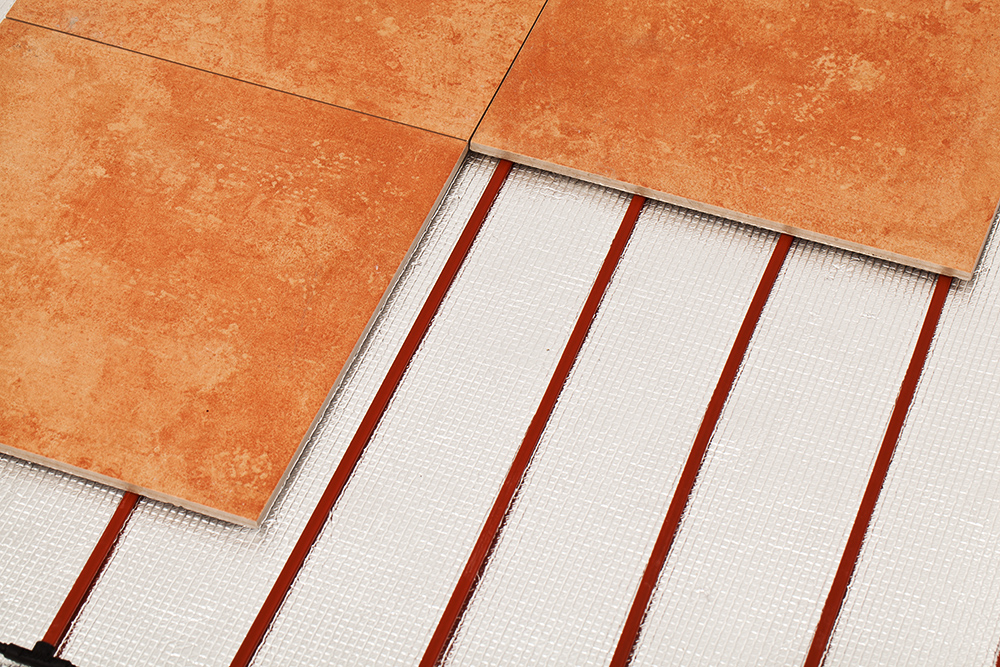
Mats are a reinforced mesh, in which the heat cables are embedded. Due to the small (no more than 3 mm) thickness of the material and their low weight, they are suitable for laying in any premises, including apartment buildings.
Depending on the type of cables used, there are mats with two-core cables and single-core cables. The first have a higher cost and increased elasticity. The last indicator is important when laying a cable heat-insulated floor.
If we talk about heating mats, where the cables are already laid in a grid, there is no need to spend money on material with a more expensive two-core cable. In other words, it makes no difference whether it has a stranded or single-core cable.
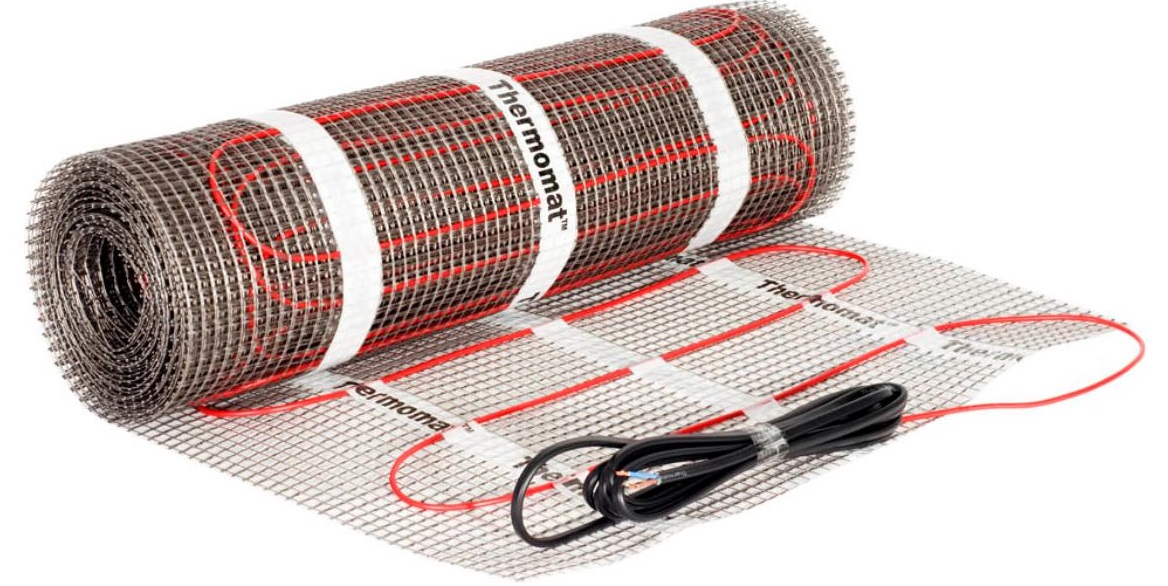
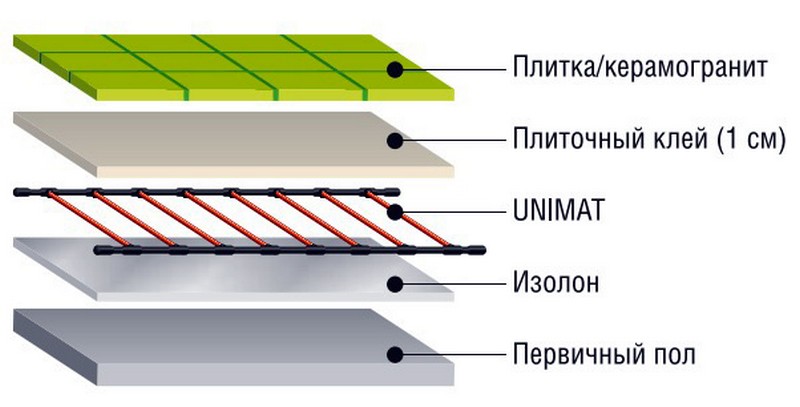
Cables heating mats withstand high temperatures, the system has a thermostat. For the most effective and safe combination with tile when installing mats, the first layer is laid with a layer of insulation.
The advantage of heating mats is the ease of installation with their own hands, fast heating and the ability to regulate the temperature. However, such a system is not suitable as the sole source of heating. In addition, its operation will be more expensive compared with the use of electric cable flooring.
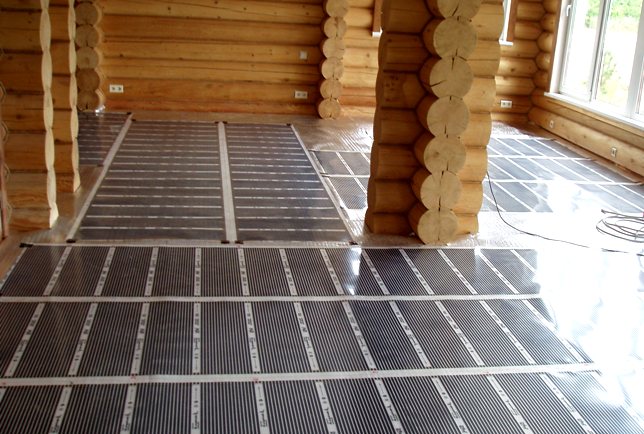
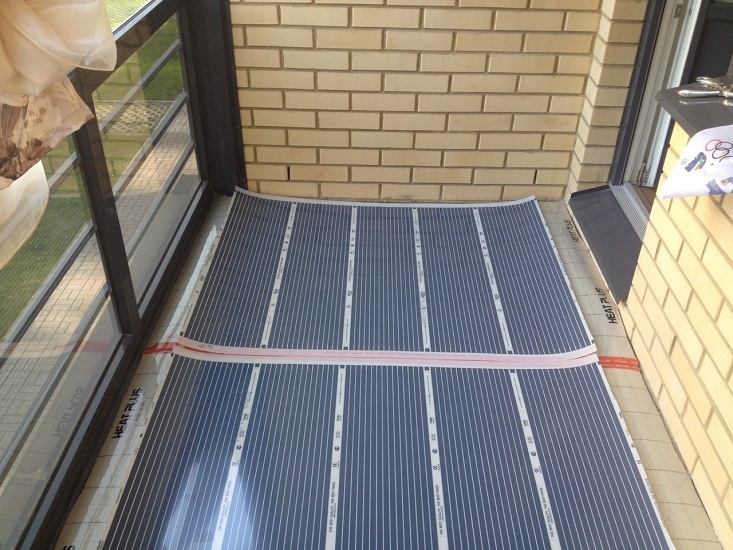
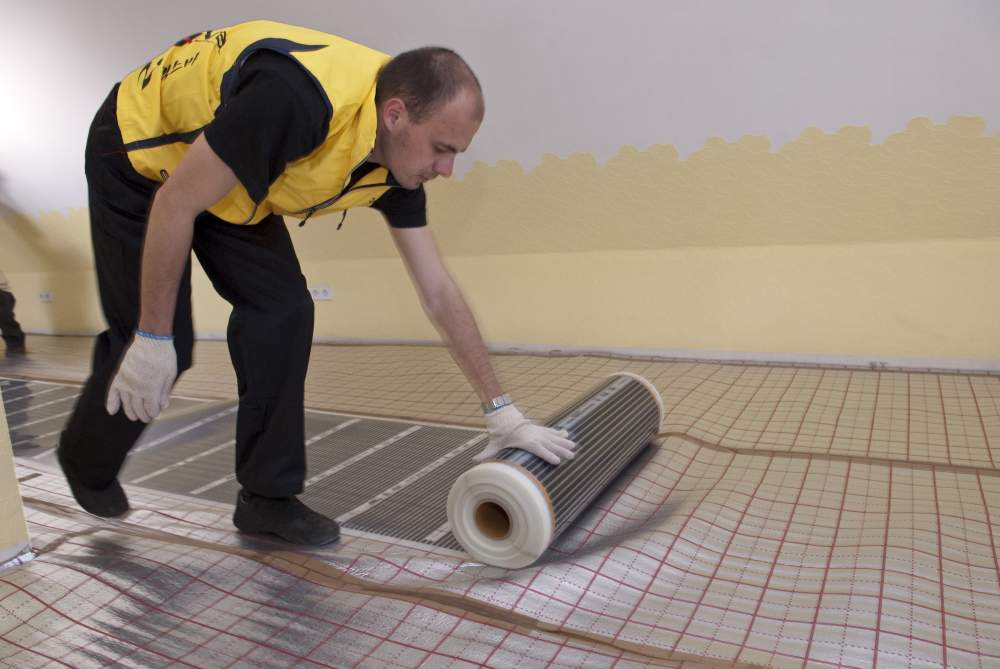
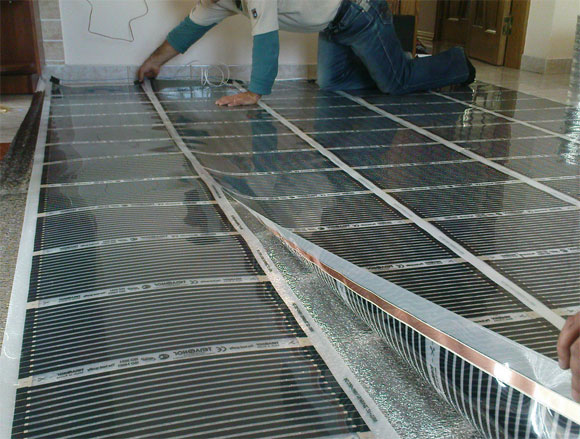
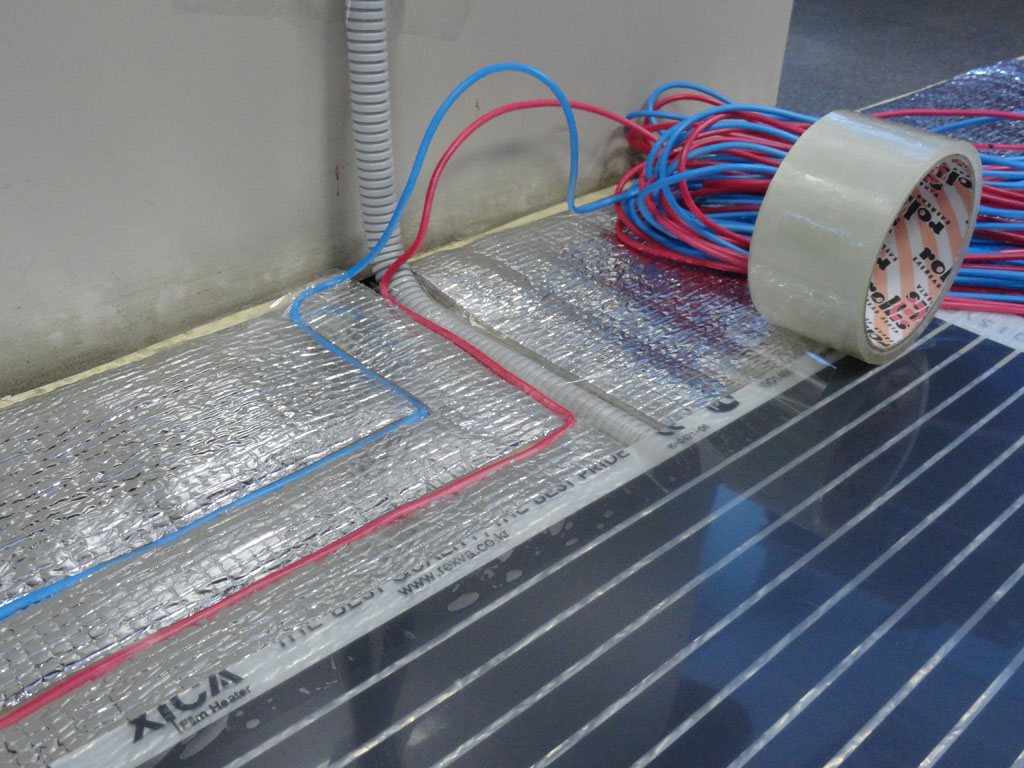
Film
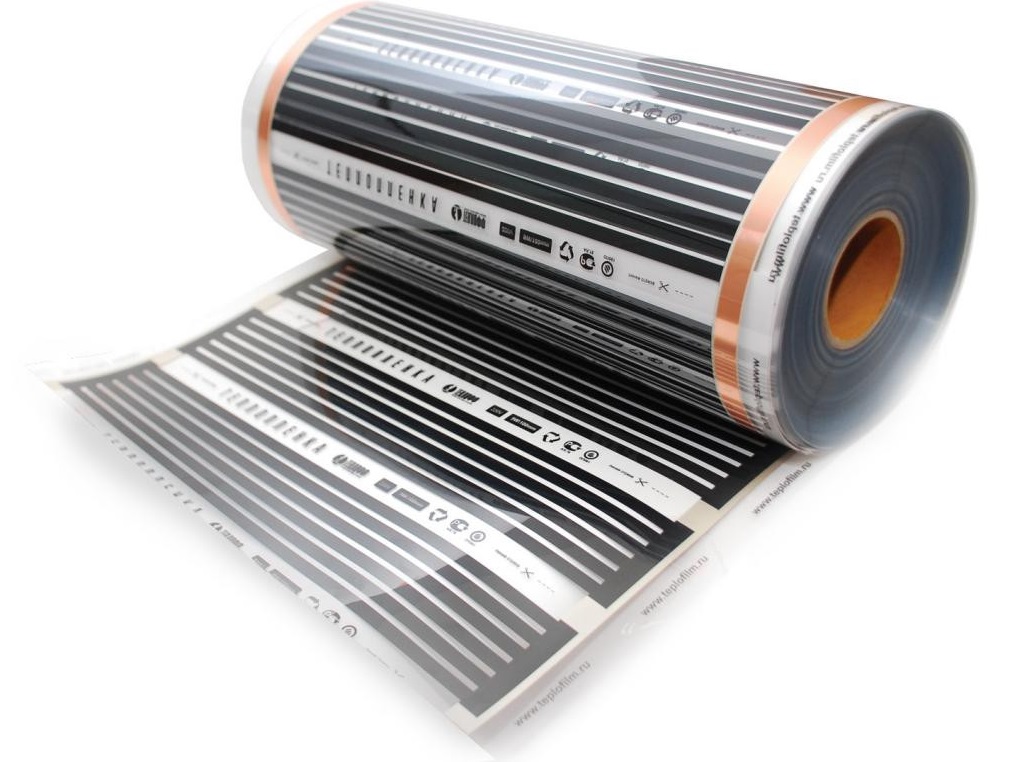
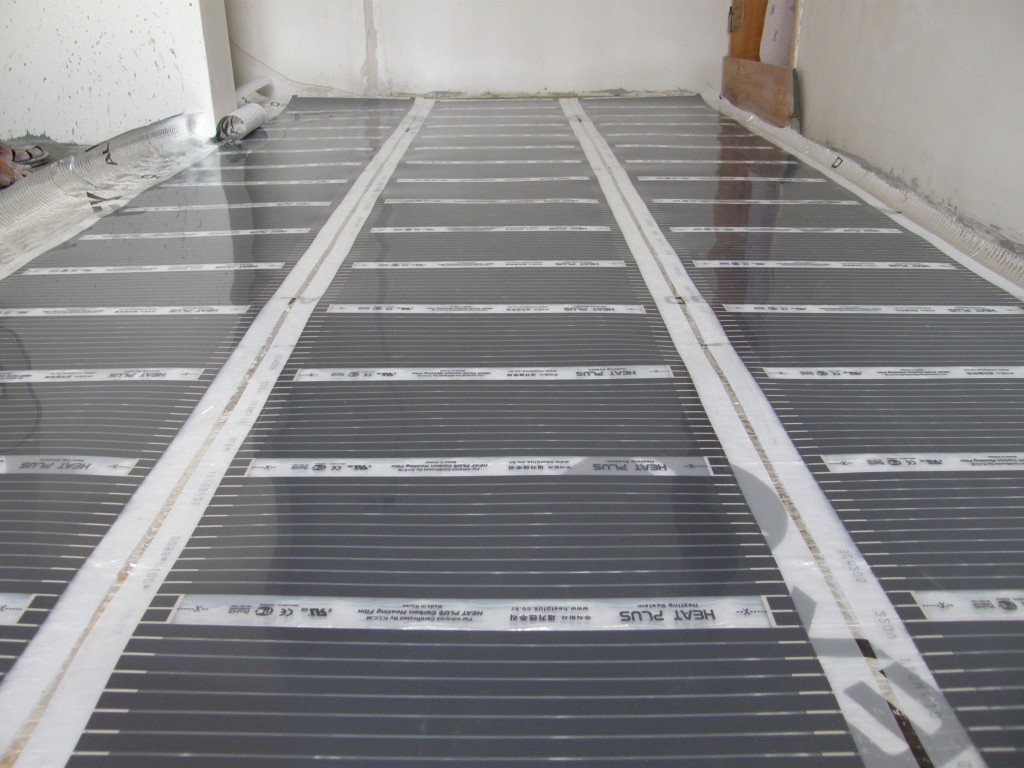
Film floor is an infrared film of small thickness, in which carbon fiber plates are embedded. Due to the peculiarities of the structure and functioning of such an electrical system is considered the most efficient, heat-saving.
The small weight and thickness of a film causes universality of its use. A feature of the film system is the creation of a comfortable microclimate in the room - the objects and people are heated, and the heated objects, in turn, give off heat to the air. The latter is heated evenly, without drying out.
Another advantage of the infrared floor - when one section of the coating fails, the system continues to work This is possible due to the parallel connection of elements.
The use of a film requires the installation of a fiberglass-based installation grid, since the electrical system is incompatible with tile adhesive.It is worth noting the higher, compared with the prices of the systems discussed above, the cost of the infrared floor.
Rod
Core floor is an advanced form of film floor. Its principle of operation is also based on infrared radiation. Through the use of carbon rods embedded in a film based on polymers, it was possible to achieve a higher mechanical strength of the floor. This allows you to lay it even under massive interior items.
Laying the core system does not require additional substrates, the material is well compatible with floor tiles.


Like the infrared floor, the core variant continues heating even when individual sections fail. To determine the place of dysfunction is quite simple - the floor in this place remains cold.
Naturally, having such significant advantages over other systems, the core floor has the highest cost.
Which is better?
The market offers a huge number of heating systems, and therefore the buyer is not easy to make a choice. To facilitate this process will help rating electrical systems, based on customer feedback and expert opinion.
So, if we talk about cable floors, then the British brand has good reviews. Energy. The system has a pleasant ratio of price and quality. With the affordability of the material has a good functionality, characterized by ease of installation.
Domestic analogue - "Heatlux". The system is based on a two-core cable with a length of 28 m (enough to heat an area of 2.8 square meters). The advantage is the high power floor, which turns, in turn, increased energy costs. A good option if you can not buy a more expensive brand.

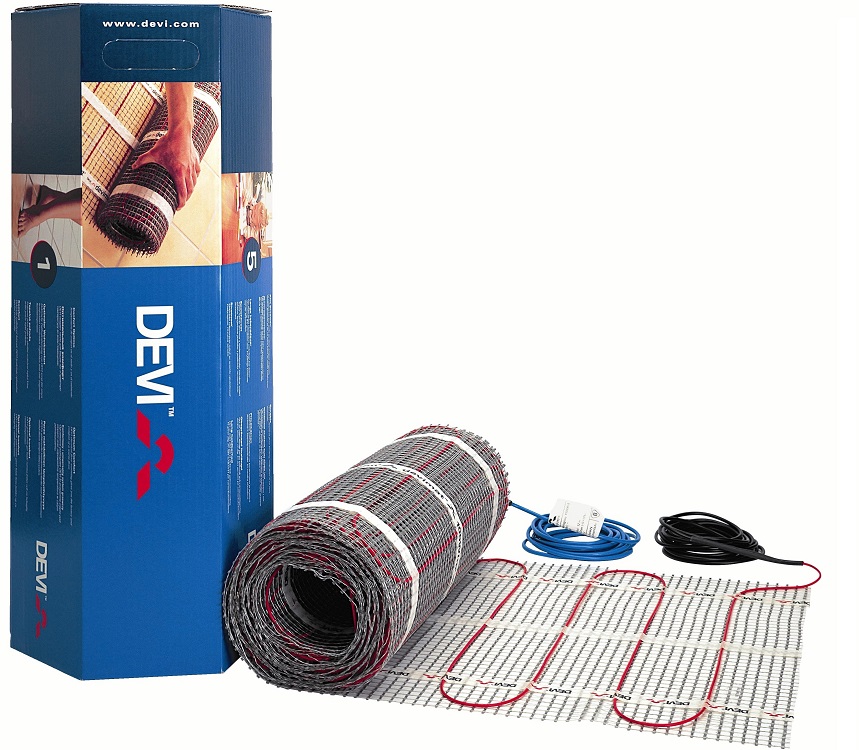
The leader among the cable systems of the average price category is the Polish manufacturer Devi. Brand products are based on self-heating two-wire cable. The system is suitable for installation both indoors and outdoors.
If we talk about more efficient infrared systems, then the floors from the Korean manufacturer deserve attention. Caleo. The system is characterized by absolute self-regulation, which allows to reduce energy consumption by 5-6 times after the desired temperature is reached. Among the advantages are ease of installation, largely due to the detailed instructions and the availability of a disk with a detailed description of the process.

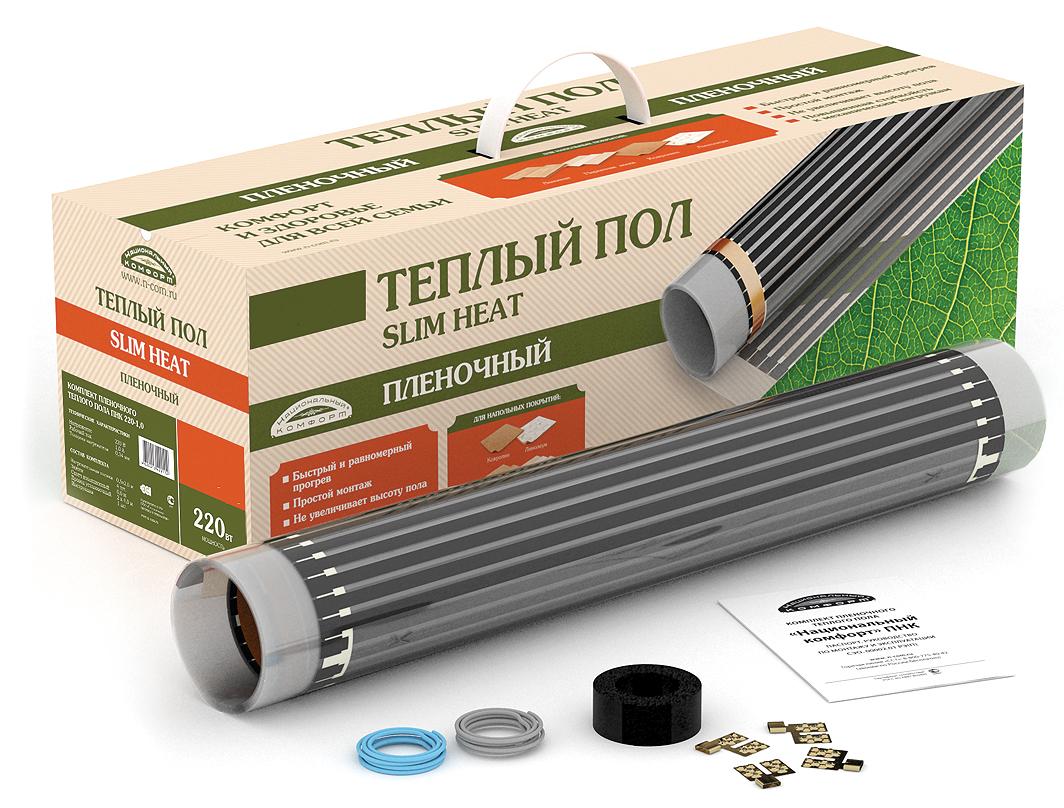
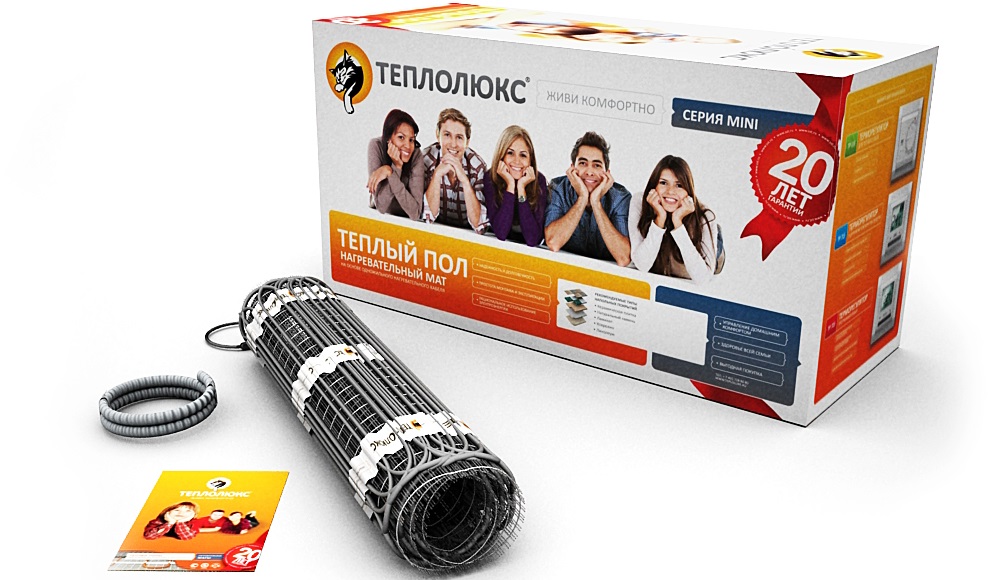
Domestic manufacturer "Teplolux" also produces an infrared floor in the line "National comfort". This is a budget model with a long service life. At a voltage of 220 watts, the power model is 150 watts.
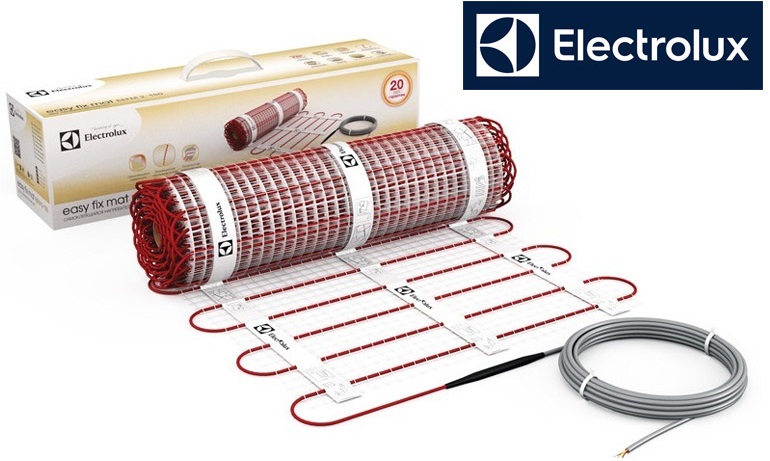
The leader among the pivotal floors is the Israeli brand products Electrolux. This is an ideal option for tile - on an area of 4 square meters. The power of a two-core cable will be up to 600 W / sq. m. The average cost (per specified area) is within 8,000 rubles. Due to the use of aramid-based cables in the system, high mechanical and thermal strength of the floor is achieved.

When choosing a warm floor, 2 more factors should be considered:
- Power consumption;
- Heating time
Electricity consumption
Electricity consumption depends on the type of floor. When laying cable systems, the consumption depends on how thickly the cable is laid. In mats and film floors, the arrangement of cables is fixed, as is the energy consumed.
For effective floor operation, a certain power per square meter is required.
Under the tile for indoor use, this figure is 110-180 W / sq. m, for street - 2-3 times higher.
It is important to consider the characteristics of the room. The less its heat loss, the less powerful the floor heating system can be. For cold buildings, electricity consumption per 1 square. m can reach up to 300 watts. In other words, when organizing a heated floor on a balcony, for example, a more powerful version of the system is required.
The type of flooring is also important. If the power system under a wooden floor can have a power of 110-130 W / sq. m, then a tile requires a version with a capacity of at least 150-180 W / m. sq.
To choose the optimal power allows a special formula. For example, for a bathroom in a standard apartment (where there is central heating), the floor capacity is 1 square meter. m is an average of 150 watts.

This indicator should be multiplied by the area of the room, after excluding from it the area for plumbing and furniture. On average, this is 3 square meters. m. So, we multiply 150 W / sq m by 3 sq m, we get 450 W.
Given the resulting figure, you can select the footage of the cable of the electric floors. This is the optimal power value. When it decreases, the efficiency of a heated floor decreases, while increasing it does not avoid unreasonable expenses for electricity.

Heating time
The heating time of the electric floor depends on whether the heating system is laid directly under the tile or installed in the screed. In other words - the type of system.
To estimate the heating time, there are certain forms that are often understood only by specialists. In this regard, we discard the calculations and give the standard heating time for different types of floors:
- A heating mat laid under a tile 1.5-2 cm thick has a heating time of just under an hour (45-50 minutes);
- Cable system in a 5 cm thick coupler without heat insulation in a heated room - 2-2.5 hours;
- A similar system with thermal insulation - 1.5 hours.
Thus, the minimum heating time is demonstrated by a system of mats and films installed immediately under the floor covering. When using powerful models, the time can be reduced to 30 minutes.
Compared to the mats under the tiles, the cables in the screed heat up 3 times longer. However, this value can be reduced by 2 times, if you provide the screed with a layer of insulation. It is also necessary in those cases if there is an unheated room or ground below.
When it comes to floor heating time, the power indicators, the location of the temperature sensor, and the features of the insulation installation should be taken into account.
If the power calculation is incorrect, the system does not “pull”; the floors do not warm up or warm up for a long time.. If the temperature sensor is located too close to the heating element, then it reaches the desired temperature faster than the floors in the room, and turns off prematurely. In the absence of thermal insulation or insufficient thickness of its layer, heat loss exceeds the heat generated, so it seems that the floors heat up longer and the desired temperature is not reached.
How to choose?
The choice of a heat-insulated floor under a tile depends on features of the room and financial possibilities of the buyer. If you are looking for an inexpensive option, then you can stop the choice on the cable system. Its advantage is that by adjusting the density of cable laying, you can adjust the power depending on the purpose of the room. For example, for a bathroom it is recommended to choose a floor with a power of 140-150 W, while for a kitchen it will be enough 110-120 W. For balconies and other unheated premises requires a power of 150-180 W / sq. m
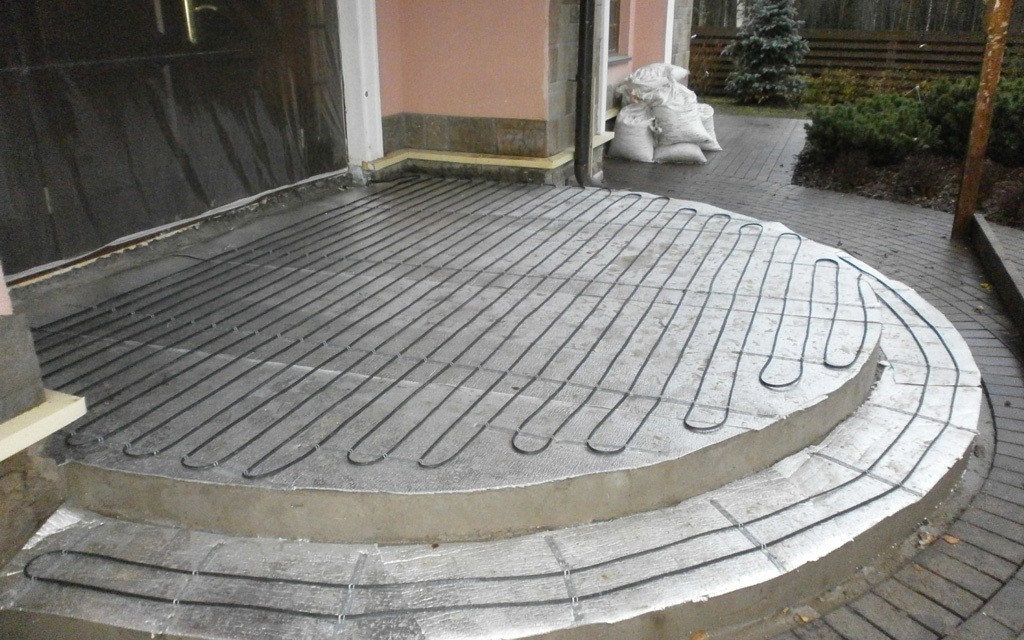
A prerequisite for installation of the cable system is the presence of a tie, which increases the load on the floors and reduces the height of the room.This, in turn, reduces the scope of this type of flooring. However, they are not bad for private houses, garages and streets (verandas, gazebos).
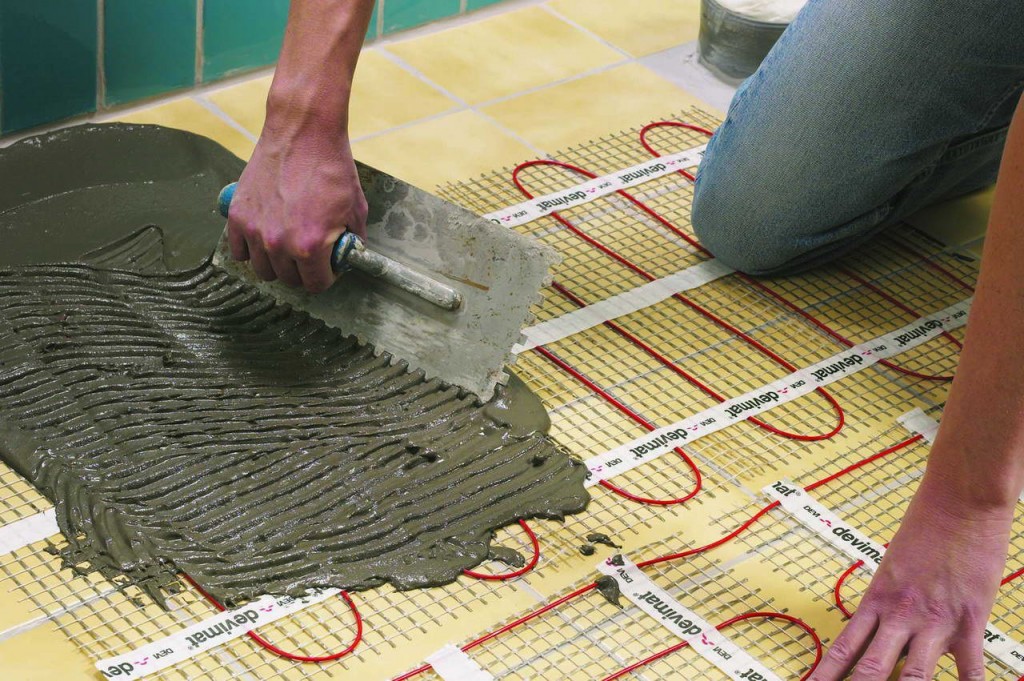

According to the reviews, the best in terms of price and efficiency, if we are talking about a warm field under the tile in the bathroom or GVL, is a heating mat. It is easily mounted - the roll is rolled around the room and is attached to a sub-box that has a thermostat. The mat is not afraid of exposure to tile adhesive, so additional insulation is not required.
If you want maximum efficiency and a “clean” installation, and you are ready to spend a lot of money - choose an infrared floor. This is a smart system with independent temperature control, high heating rate (15-30 minutes) and reliability. If even one unit breaks down, the rest continue to function.
Installation
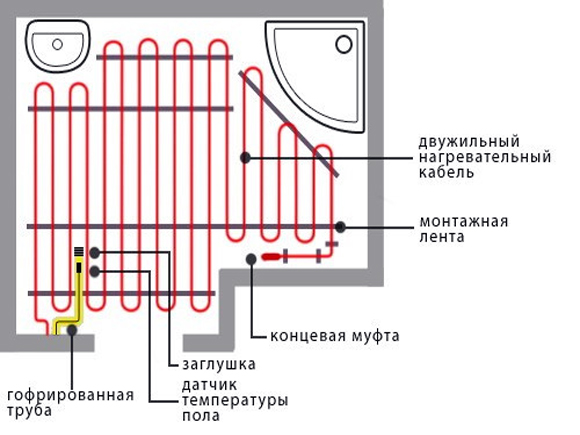
Assembling a warm electric floor with your own hands starts with drawing up a cable laying pattern. The following recommendations help to mount the floor correctly:
- Cables should not be laid under stationary interior items. Otherwise, it can lead to overheating of the elements, since there is no heat exchange between the floor and the air in the room. In addition, heating is harmful for furniture, it cracks and cracks.
Finally, to heat the floor under bulky closets and sofas is impractical from the point of view of economy.
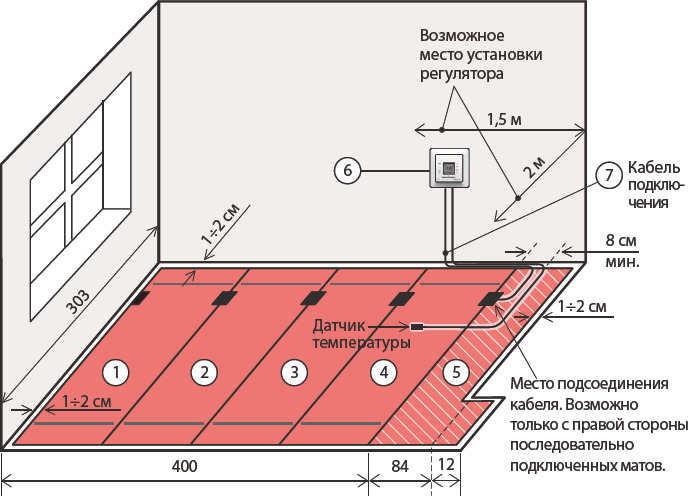
- When installing the cable from the walls and stationary furniture indent 0.5 cm; from risers and other elements of the heating system - 1 cm.
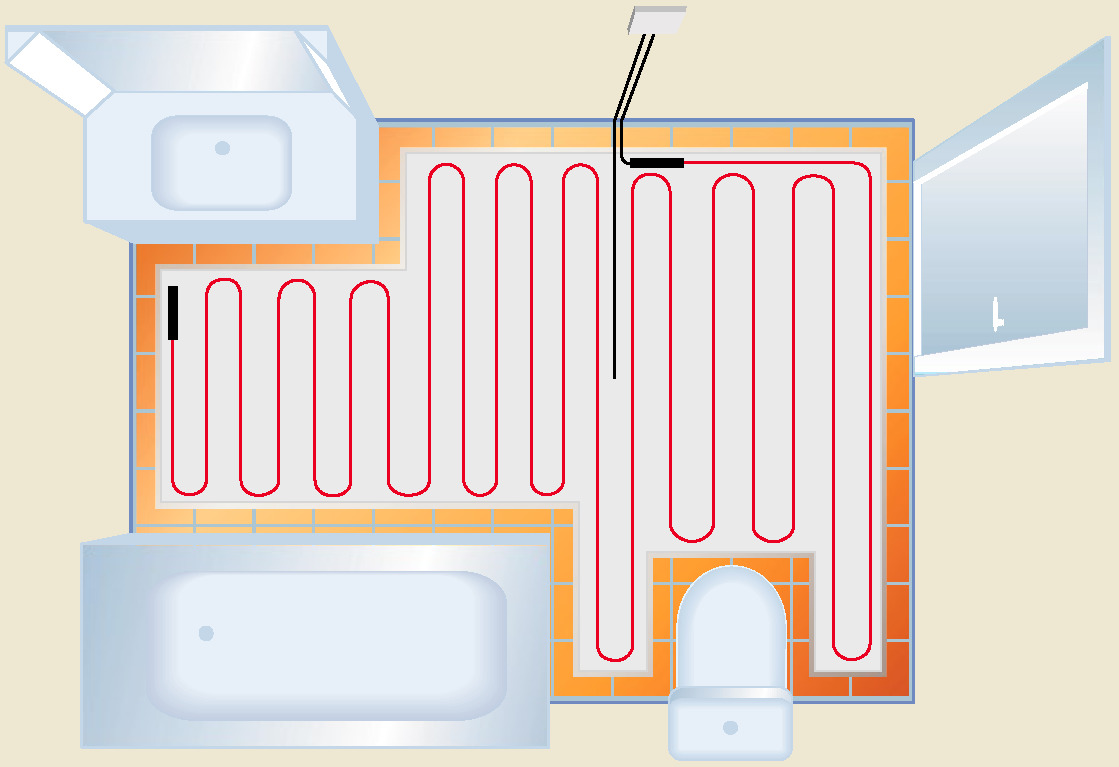
- For the effective functioning of a heated floor system, the coverage area must be at least 70% of the floor space.
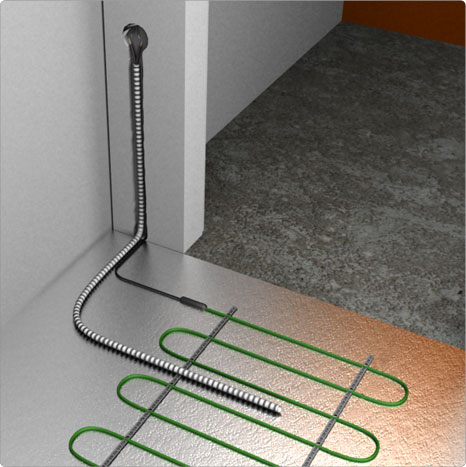
- It should immediately determine the location of the sensor. It is located at a height of 30-100 cm from the floor, it should be easy access.
- It is important to remember that the heating wires are always laid in parallel.
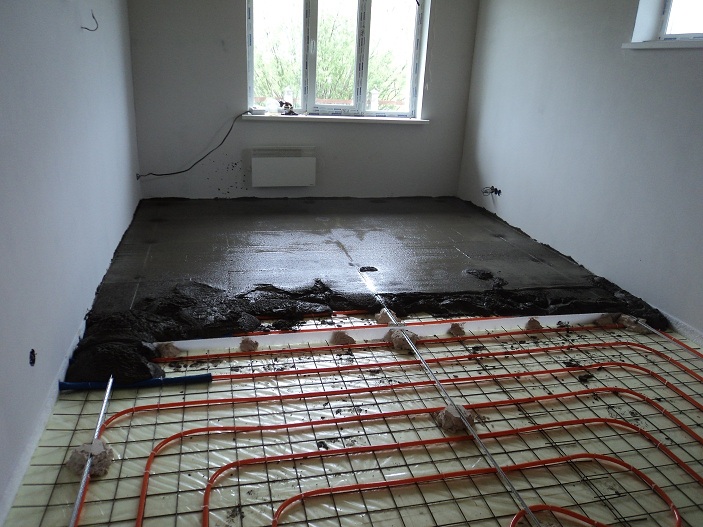
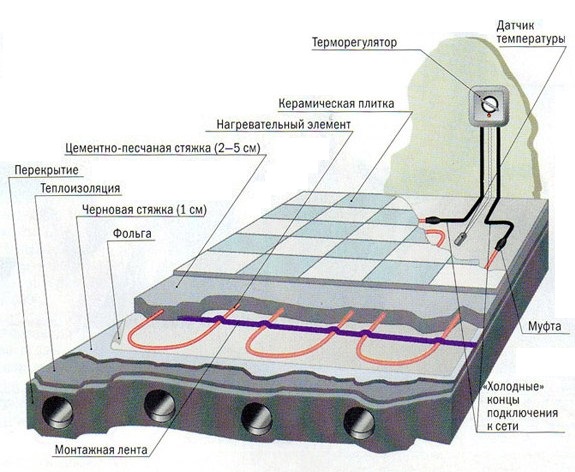
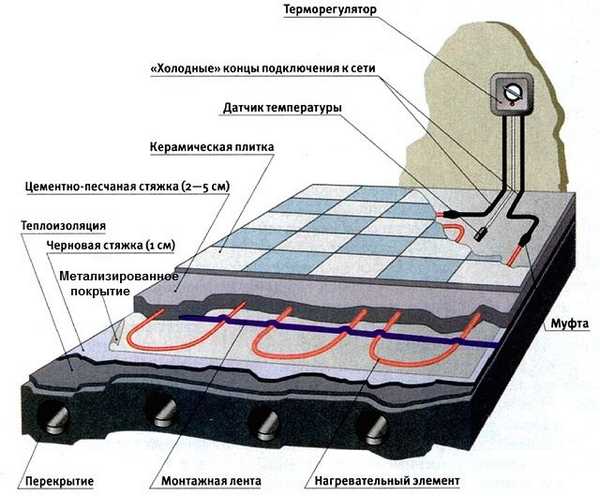
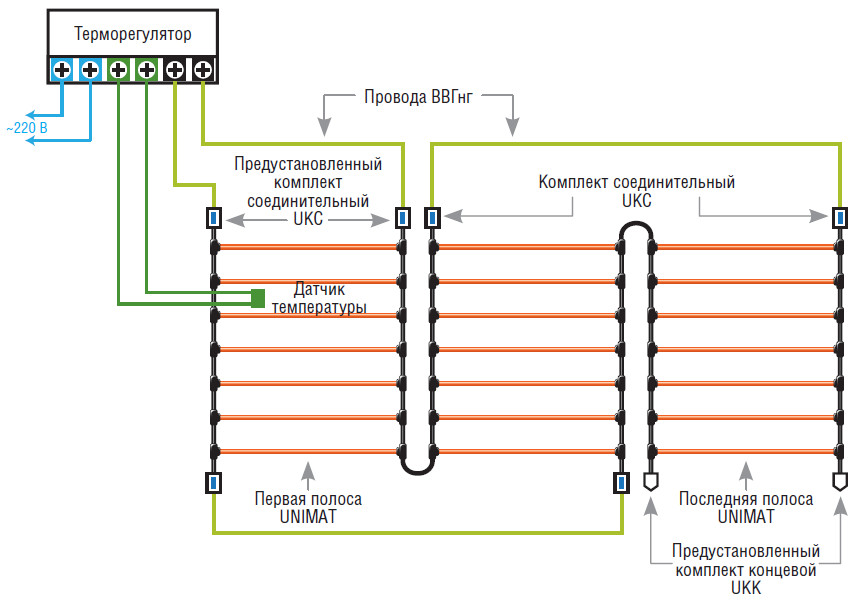
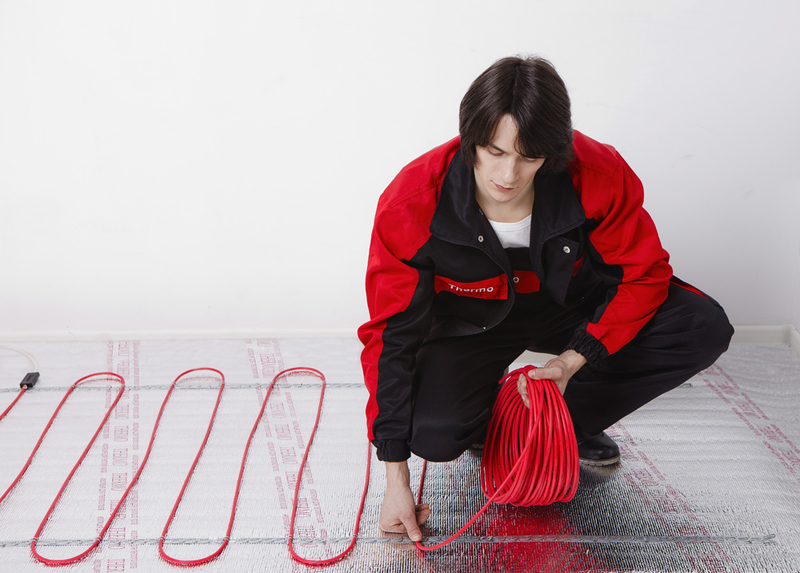
After all calculations are made, proceed to installation. The technology is one for all types of systems and includes the following steps:
- Floor preparation - removal of the old coating, leveling;
- Installing the thermostat at a height of 0.5-1 m from the floor.
- Laying shrink tape around the perimeter of the room;
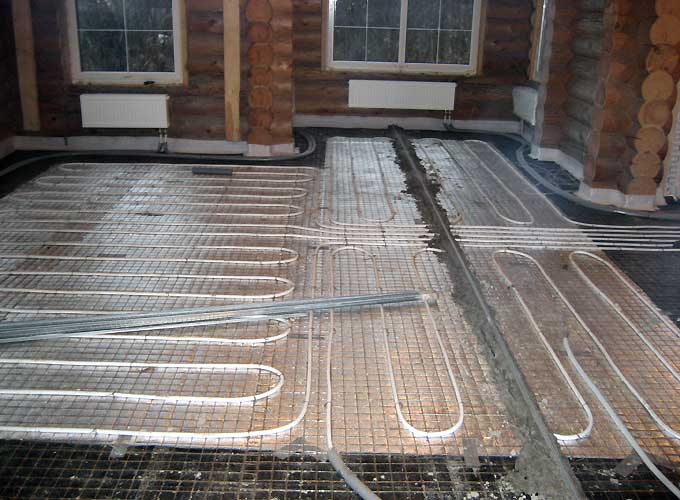
- Fill the first layer of the screed;
- After the screed has dried, the installation tape is laid, on top of it are heating cables (mats);
- Installation of temperature sensors, connection via cables of a temperature controller and an electric flooring system, their testing;
- Fill the final layer of the screed.
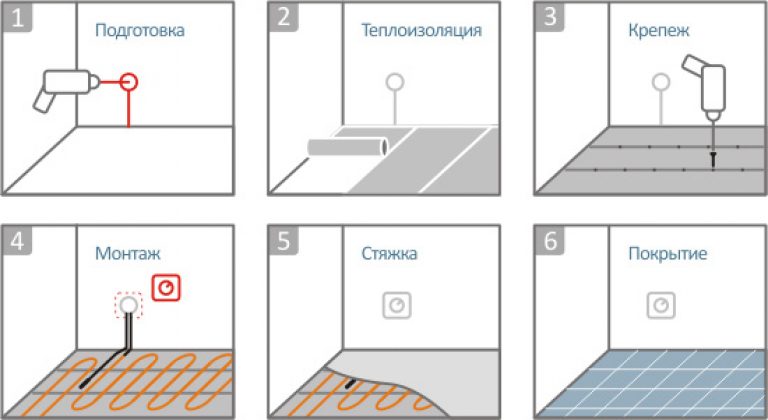
When mounting mats and films, steps 4 and 7 are omitted. When using the infrared floor between him and the tile is laid a layer of mounting grid.
It is important to ensure absolute flatness of the surface, since any bending of the cable will lead to its overheating and failure. Leveling compounds are used to obtain a flat surface.
There are 3 types of cable layouts using a cable tie:
- Installation in the screed (used for kitchens, balconies under cable systems);
- Over the tie under the tiles;
- Directly on the screed (film floors).
If the presence of heat insulation is implied, then it must be placed between the floor and the heating system. With increased humidity of the premises, waterproofing materials are placed on top of the thermal insulation materials.
For heated premises there is enough foiled insulation 2-4 mm thick.
To insulate unheated rooms, it is recommended to create a “pie”: under the layer of foil-insulated heater lay a heat-insulating material based on polystyrene foam 5-10 cm thick.
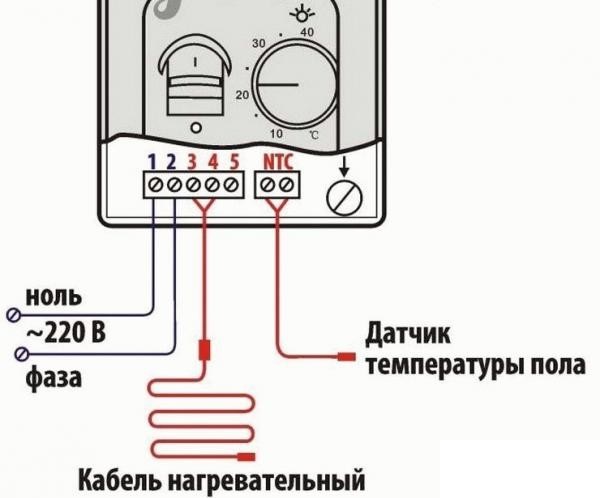
Connection
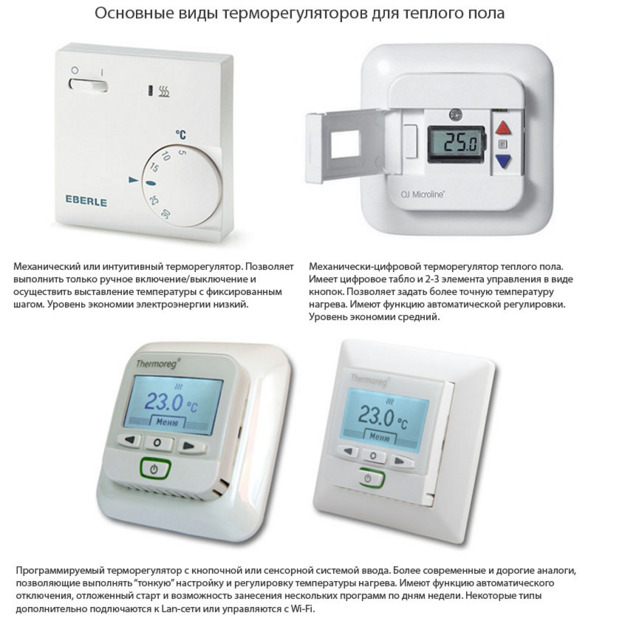
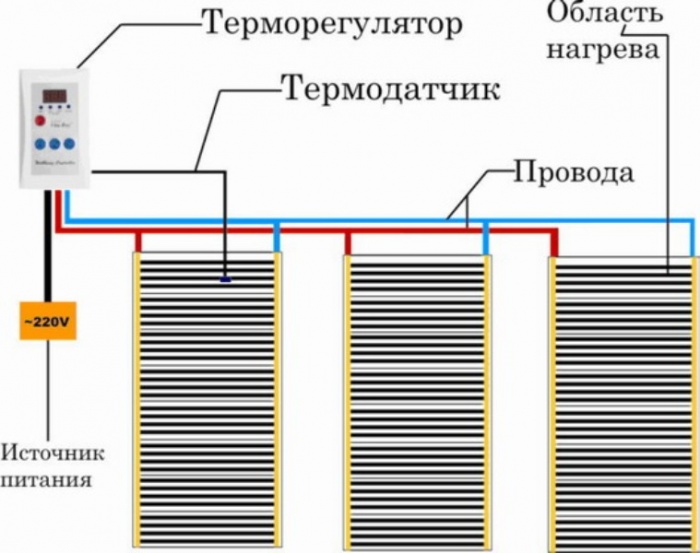
One of the key elements of the floor - a thermostat.With its help, the room maintains a comfortable temperature, the system turns on and off, based on the temperature sensor readings. In the absence of a thermostat, the floor is manually operated.
The connection of the electric floor begins with the installation of the thermostat, from the floor to the device - 1 m. Modern versions, equipped with sensitive thermal sensors, can be fixed 30 cm from the floor. The thermostat is connected through a shield or socket.

Based on how the thermostat will be installed, a hole is made for it and the gates for the wires (flush mounting) or the gates only (patch type of mounting). To the distribution box from the outlet pull the ground wire, phase, zero. The strobe "hides" and the heating wire and temperature sensor. The last step is to connect the floor heating cables and an electronic temperature control device.
When large areas of the room is recommended to connect through the flap. In general, the process is the same as when connecting through a socket. The difference is the presence of RCD (residual current device), which is mounted in the panel.
Let us consider in stages the process of installing the most common systems.
Infrared floor
The installation process is as follows:
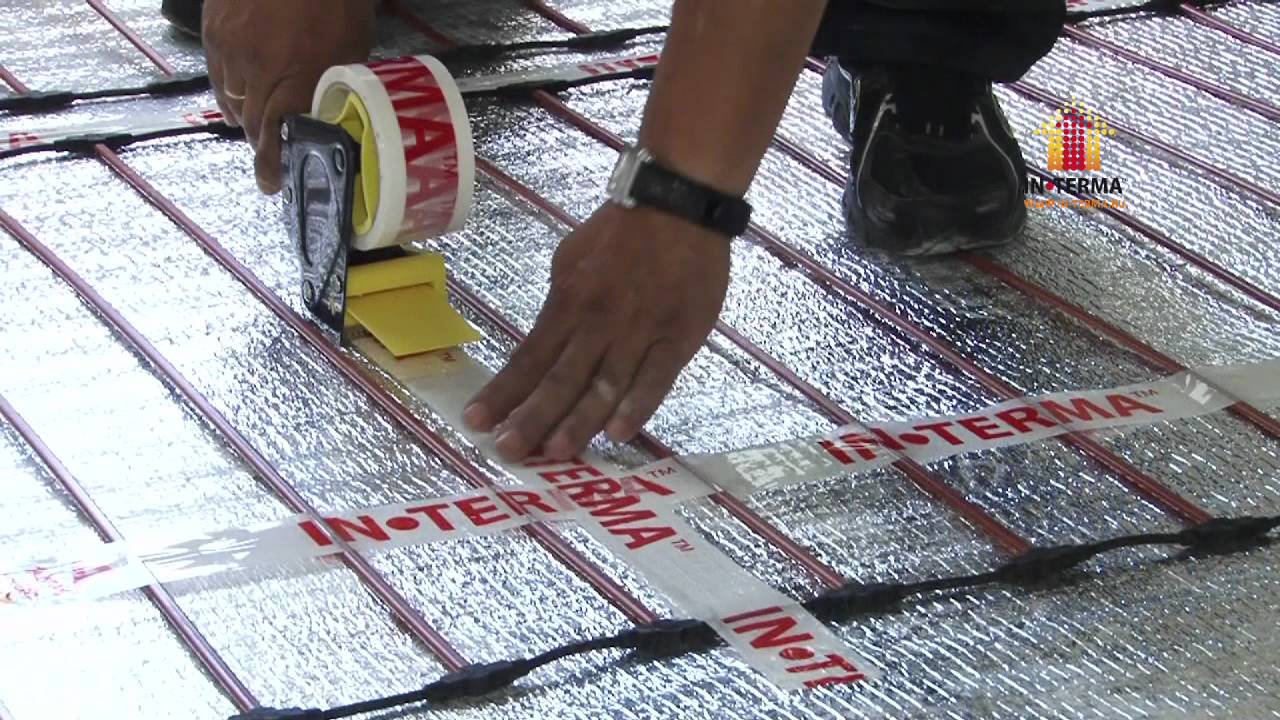
- The material is cut along special lines and rolled out in the direction of the wall with the thermostat installed.
- The joints of the film are taped.
- Between the layers of the film is placed one end of the terminal, the second is located on top, in the direction of the copper bus.
- The terminal is clamped with pliers, after which a single-core cable is attached to it.
- The mats are successively brought down one by one with a thermostat, then the ground is mounted.
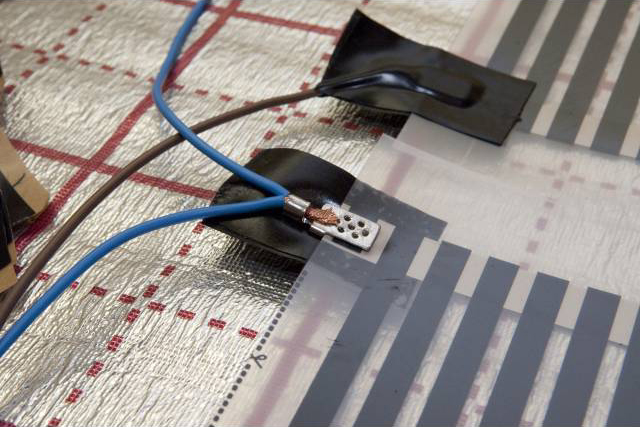
- The terminals and ends of the copper bars are insulated with bitumen tape.
- It is recommended to place the joints of the terminals and wires in the recesses made in the layer of heat-insulating material. This will help to further smoothly lay the floor.
- Connect the cable from the temperature sensor and thermostat.
- Connect the system.
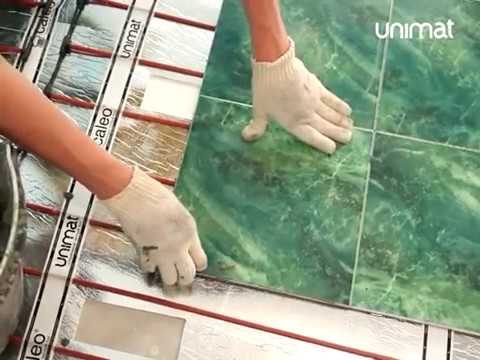
- Then proceed to the installation of floor tiles.
Rod floor
Installation steps:
- Place mats on surface.
- By means of a thermowell to provide a serial connection of wires, to isolate the resulting compound with a film of heat-shrinkable type and fix, using a building dryer.
- An adhesive tape to attach mats to a floor, previously having laid on it a layer of the foiled material.

- Connect the thermostat and the cable of the first mat.
- Between the rods of the middle mat fix the temperature regulator.
- Flatten the sensor and temperature controller, make a control start of the system.
- Pour the screed on the floor, then lay the tile.
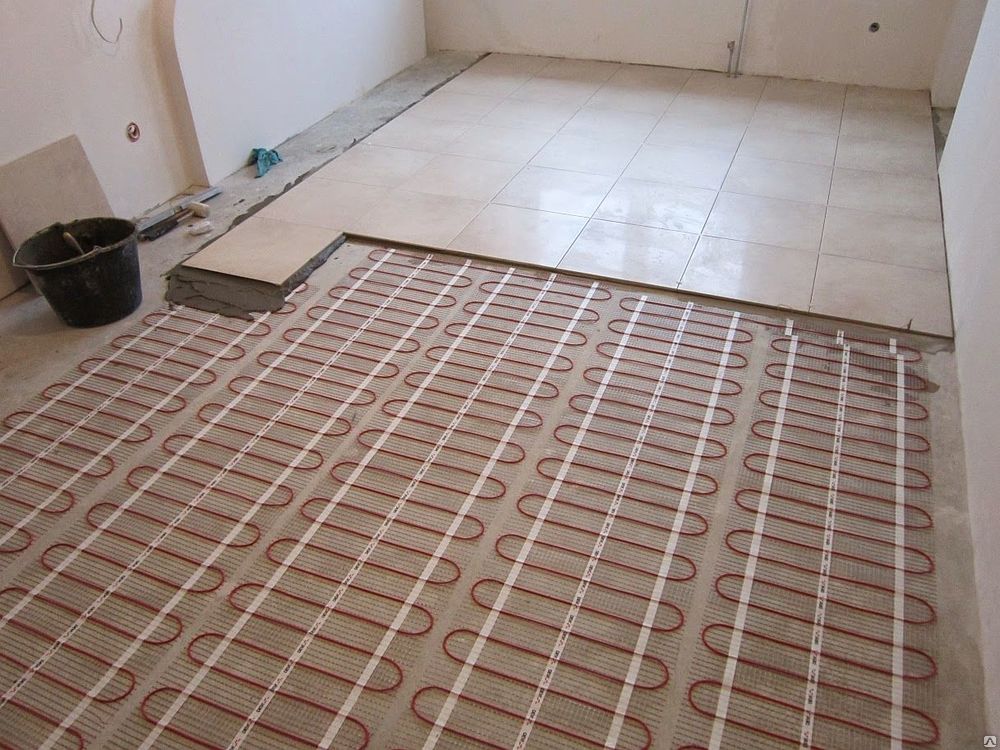
Cable system
The installation steps are as follows:
- Lay and fix the metal tape on the floor (50 cm step). It is laid across the room and fastened with screws or nails.
- Next is the heating cable, the optimal pitch is 20-25 cm.
- Lay the heating system cable on the mounting tape with clips.
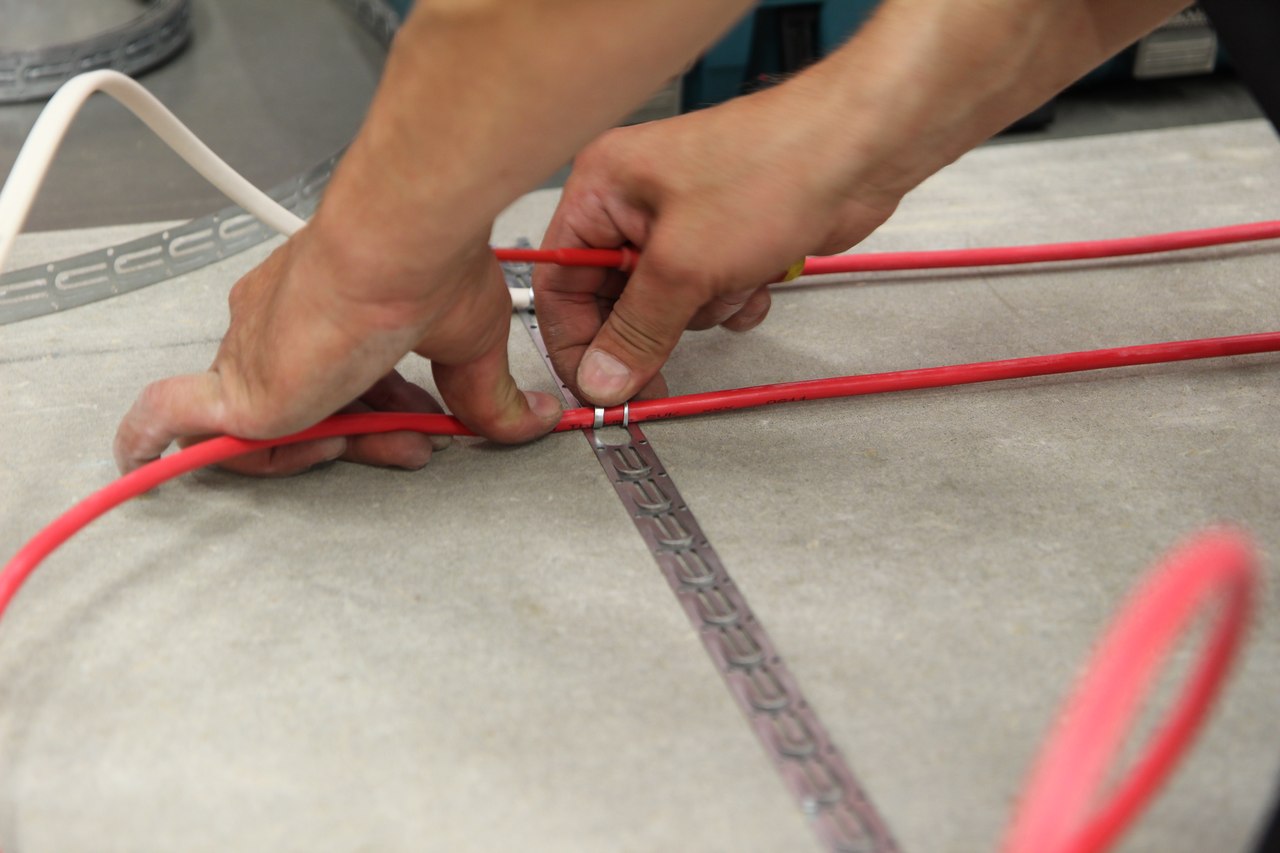
- Next between the cable lines place the sensor, the wires are hidden in the corrugation.
- The incoming cable, zero, phase, ground wire and thermal sensor cables are connected to the heating temperature controller.
- The surface is covered with concrete or screed, over which the tile is laid.

Heating mats
When installing them, the same rules are followed as when installing a cable equivalent. It is important - if necessary, only the grid is cut, and not the cable attached to it.
Professional Tips
It is important to know the following:
- To increase efficiency and more efficient floor heating, use a heat insulating coating, regardless of the floor system chosen.
- To improve the security of the system allows the installation of a separate power line and grounding system.
- Pre-calculation of cable laying and pitch will help to ensure the most efficient floor heating. This will avoid such misunderstandings as cold areas in the area of the window and doors and powerful floor heating under the refrigerator, for example.

- Do not forget to take into account the type of room when choosing the capacity of the system. So, for heating high humidity areas, more powerful electric floors are required.
- When choosing a floor tile, make sure it is compatible with the type of floor heating used.

The use of an additional programmer allows to achieve uniform heating of the open areas of the floor, reducing the power in the areas under the furniture, plumbing. This, in turn, helps reduce energy costs. In addition, programmers reduce the risk of overheating, which allows to extend the life of the floor.
- When choosing a system, you should give preference to reliable brands with a good reputation. Of course, their products will cost more. However, it is better to spend one time on installing a high-quality system than regularly dismantling the floor for the next repair of cables.
How to lay a heat-insulated floor under a tile, look in the following video.


