Subtleties of installation of pipes for underfloor heating
When installing the floor "heated" it is important to consider existing building and technical standards and regulations. In order to avoid mistakes and enjoy the heat, it is necessary to carry out all the installation work in a quality manner. The choice of materials, installation schemes, wiring, installation features - this will be discussed.
Design features
Any warm floor reduces the height of the room.
It has indisputable advantages over central radiator heating:
- independence from seasonal connectivity;
- the absence of a temperature difference between the air below and at the top of the room, what happens when batteries are used;
- exact adjustment of heating.

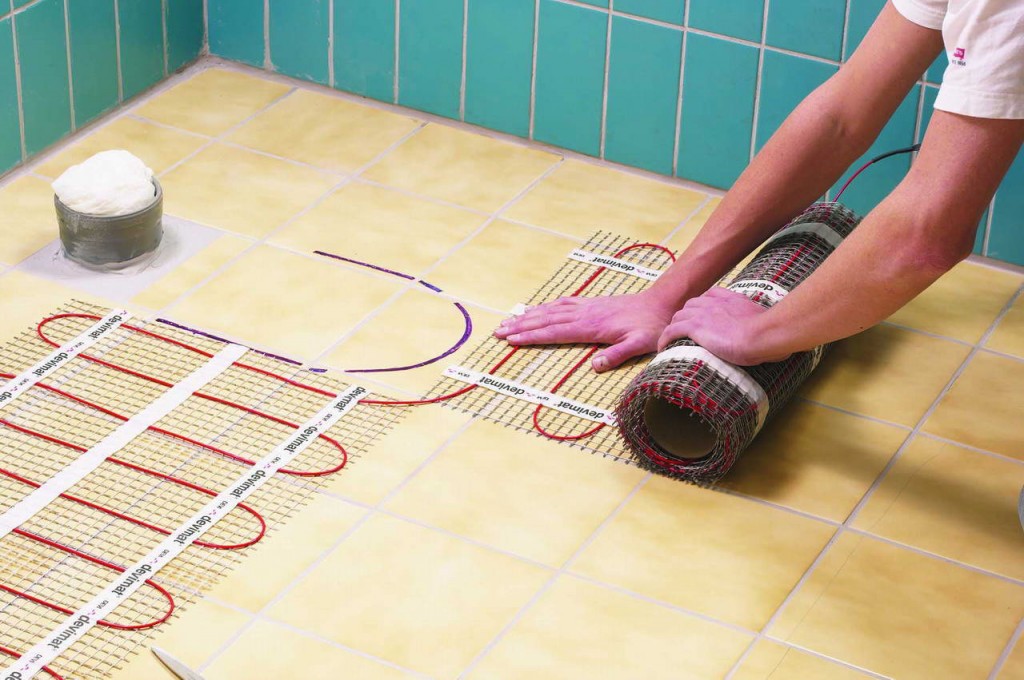
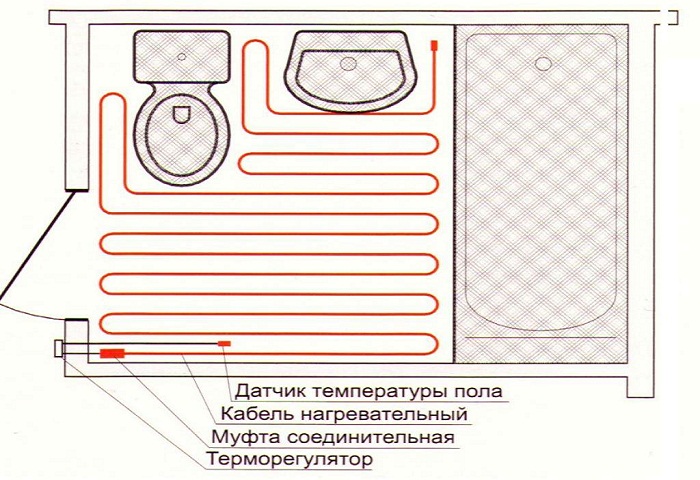
Electric floor - easy to install, the circuit may have frequent bends and small radii. Does not require sidebar in general communications. Evenly heats the floor over the entire area. Requires caution in operation.
"Water" - a simple installation, but with large radii, requires connecting a manifold or pipeline. Due to the higher price of electricity compared to water, it is more economical to operate than electric. This largely explains its high popularity.
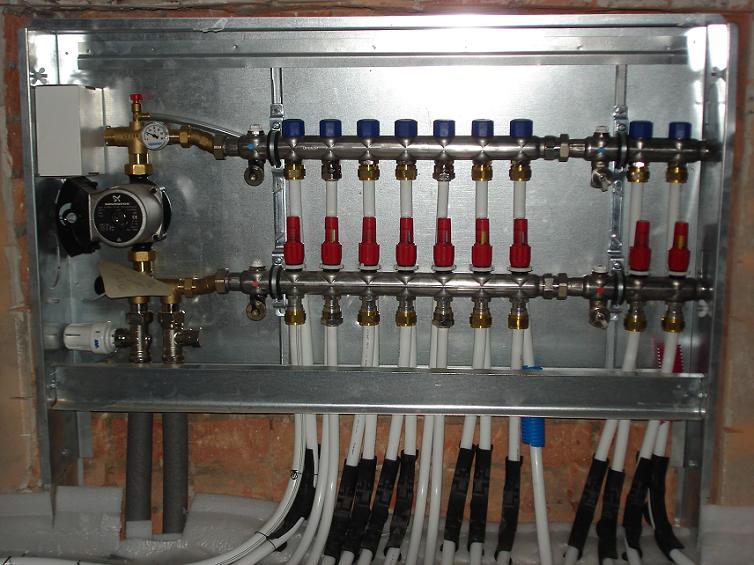
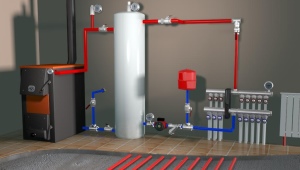
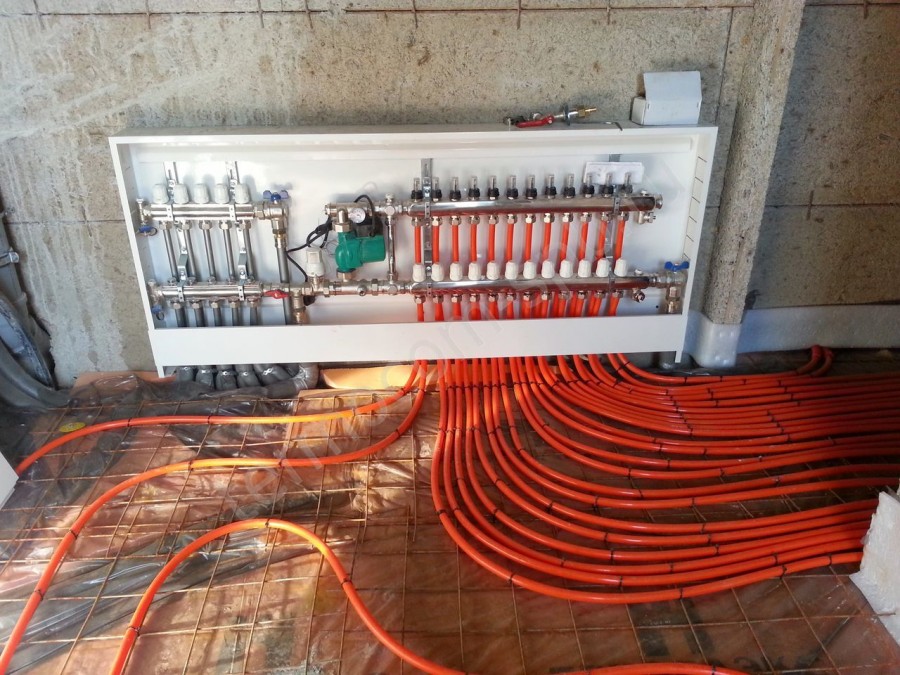
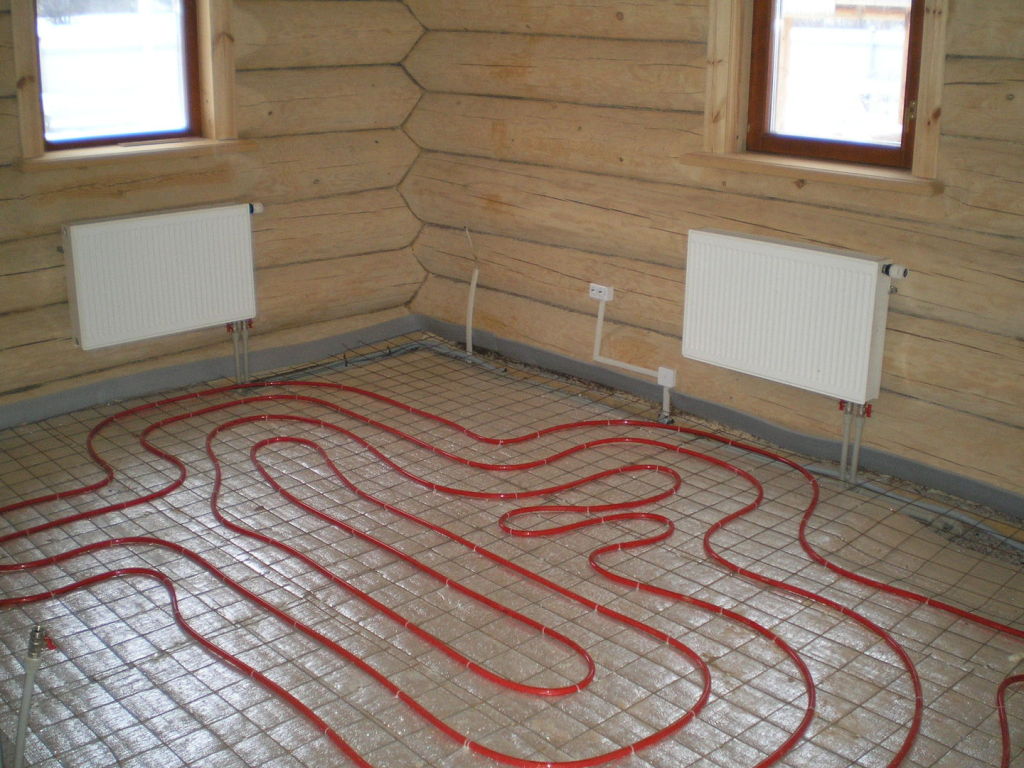
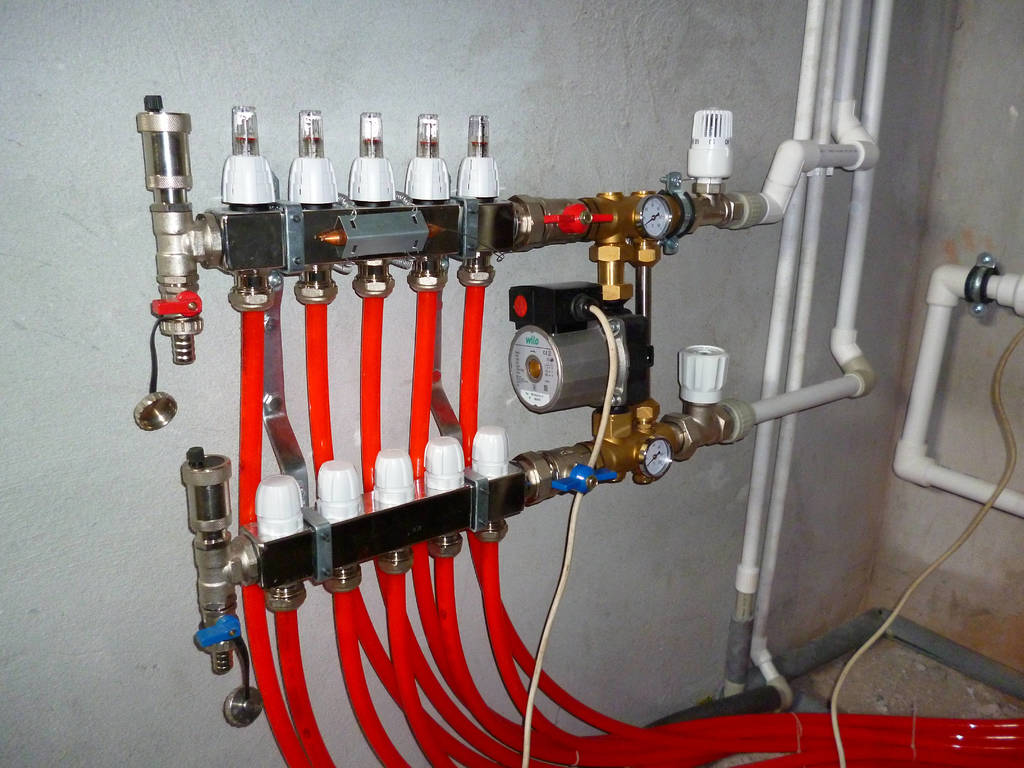
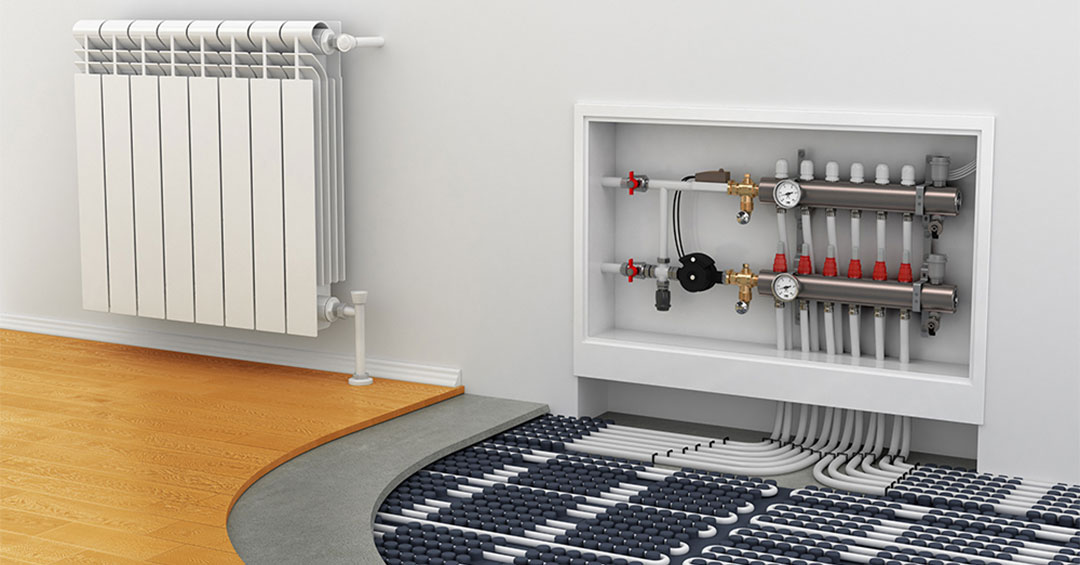
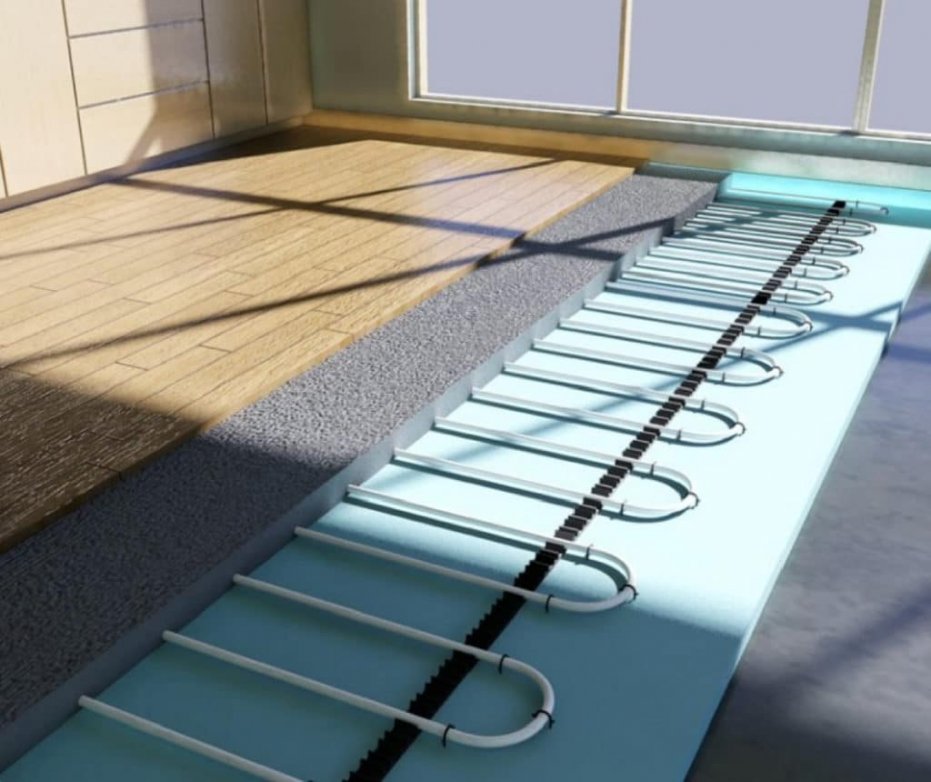
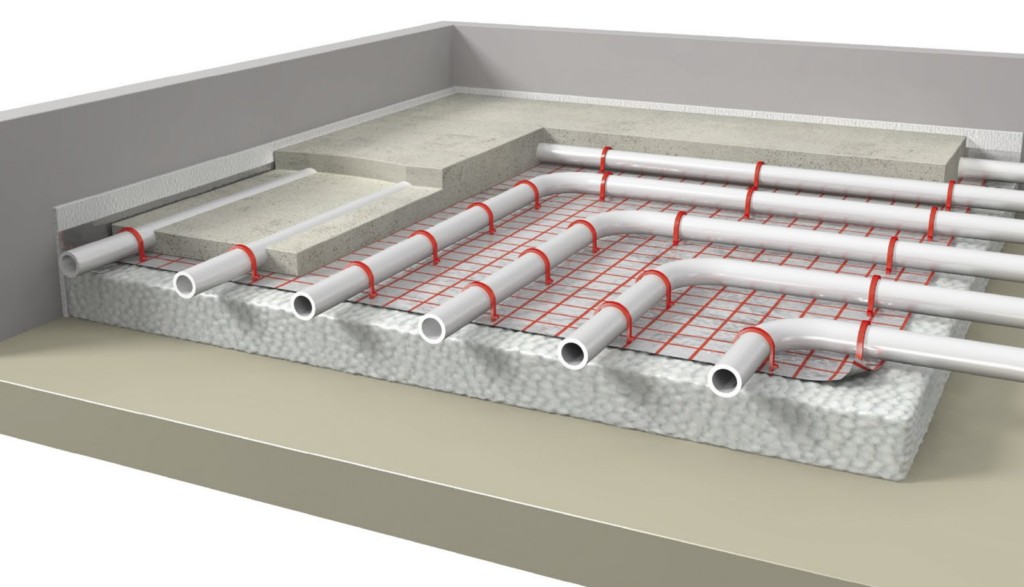
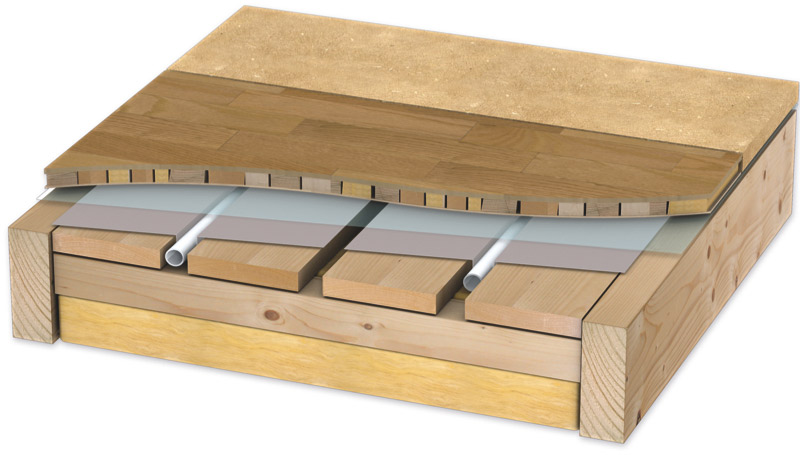
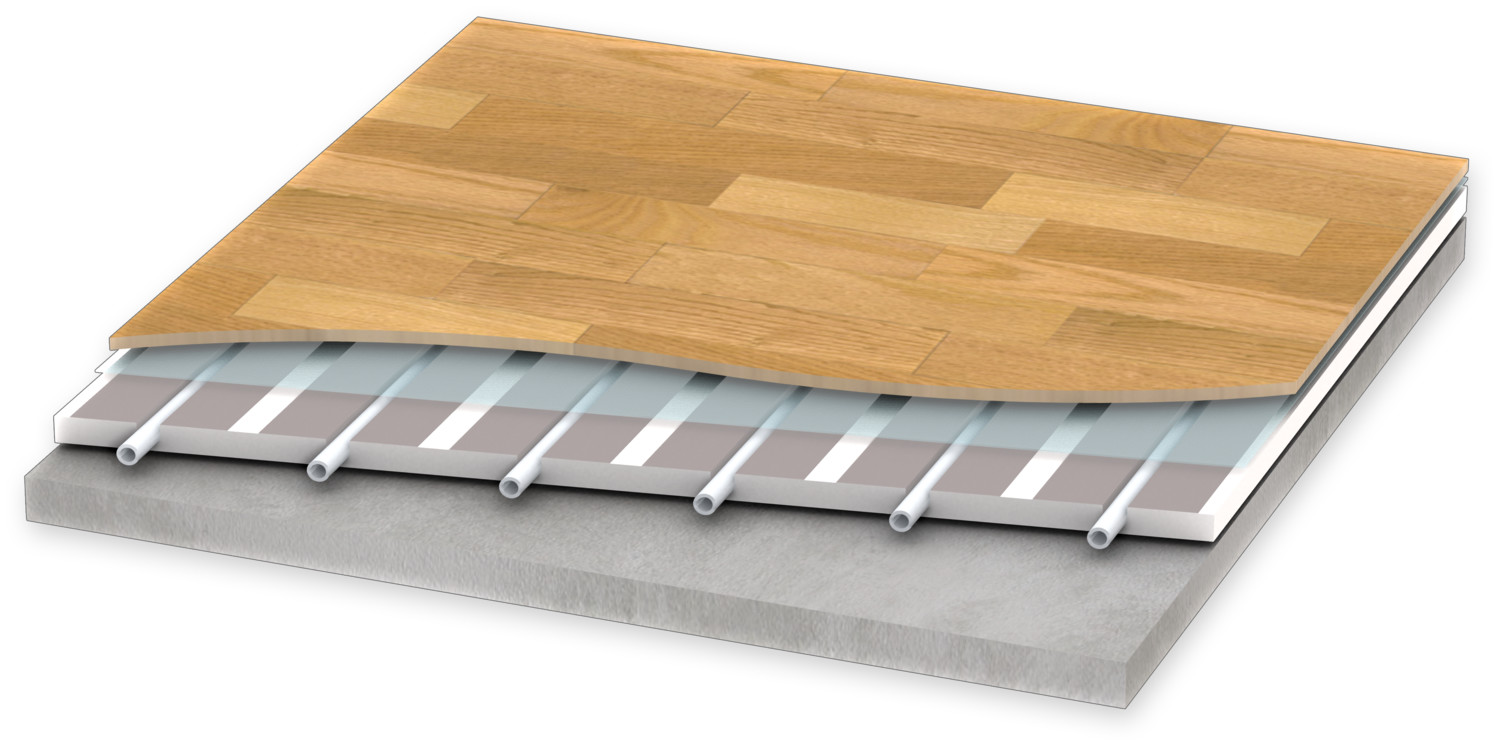
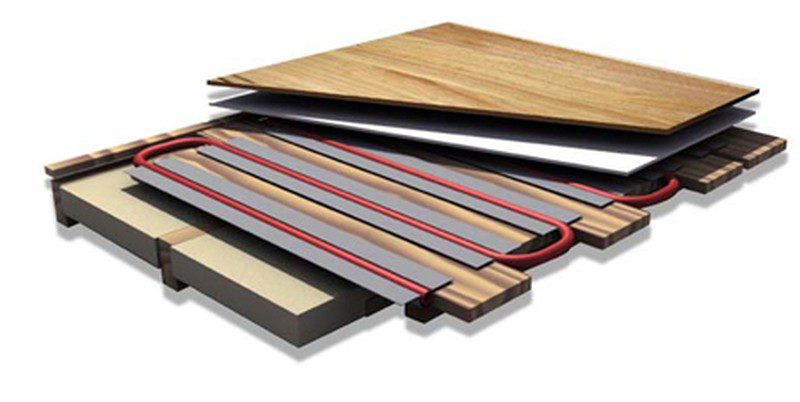
The general structure of the water floor is quite simple and is a system of metal or plastic pipes through which hot water moves. The design itself is laid in a concrete-cement screed, and control is carried out using a heat-adjusting manifold and auxiliary sensors.
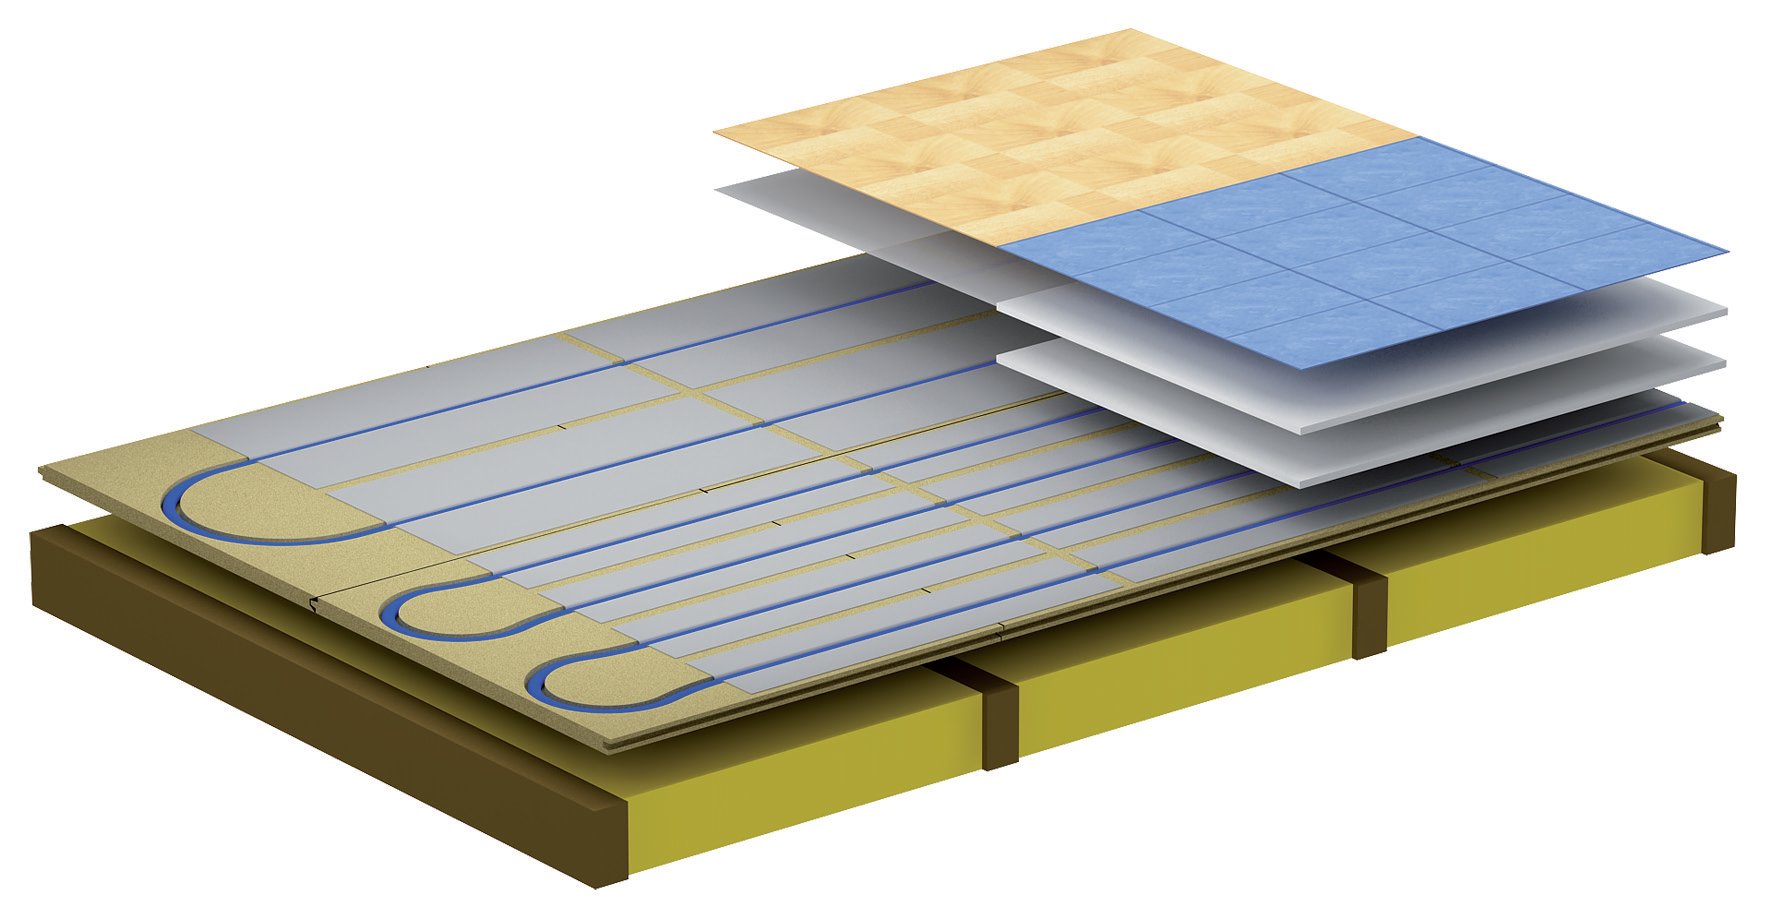
The floor construction “with heating” includes 7 basic elements:
- Overlap (base) - if the floor is required to lay on the open ground, you need to make a rough tie.
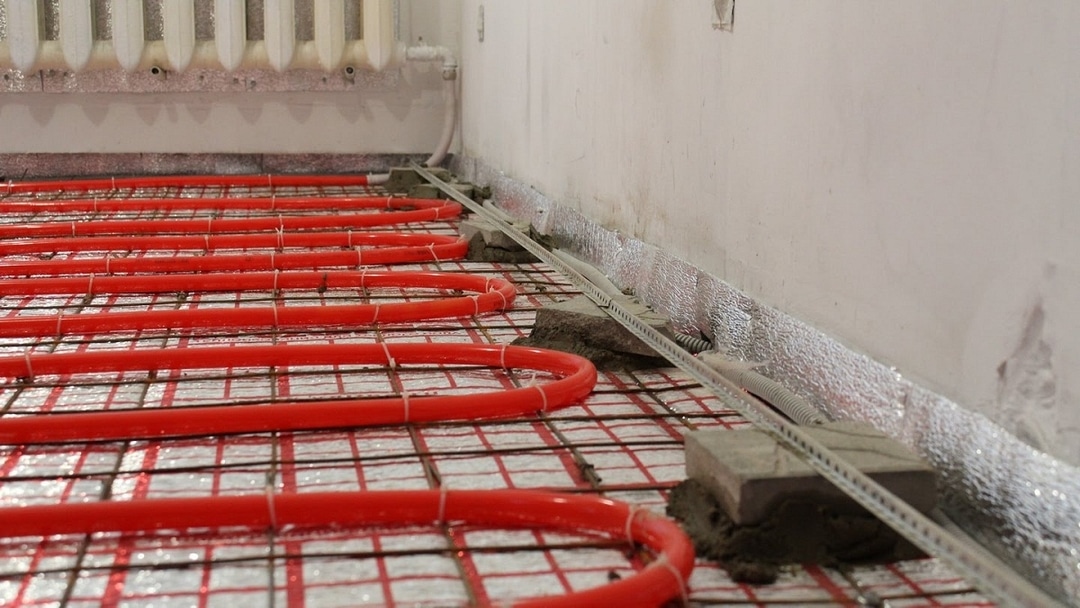
- Waterproofing - can be done by gluing the surface of an oilcloth or coating with mastic.
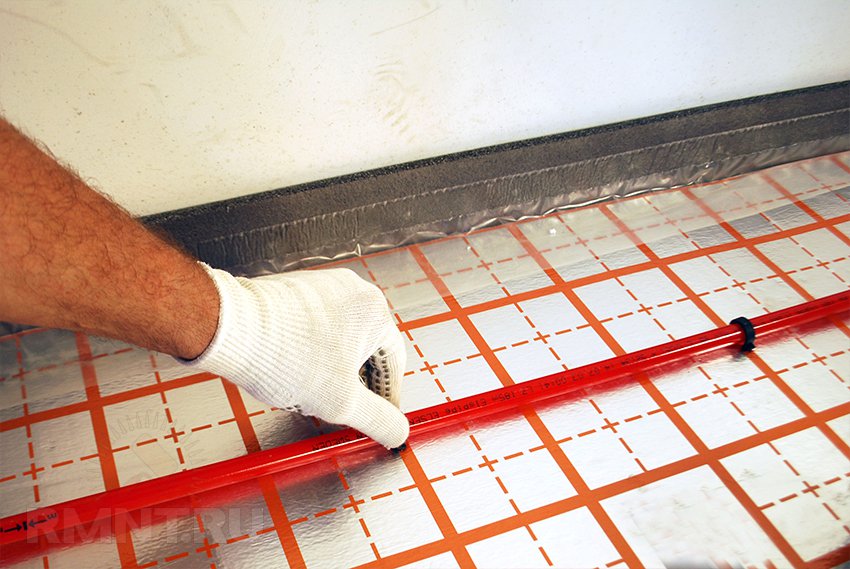
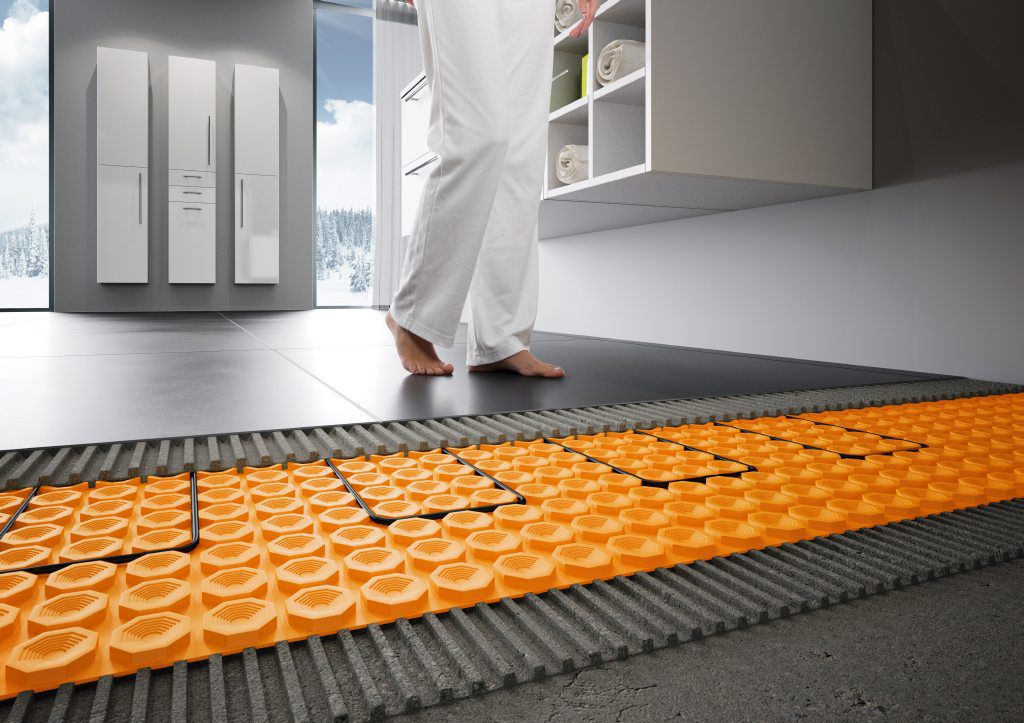
- Thermal insulation - made using mineral wool or polystyrene foam. It is better to give preference to cheaper and easier foam.
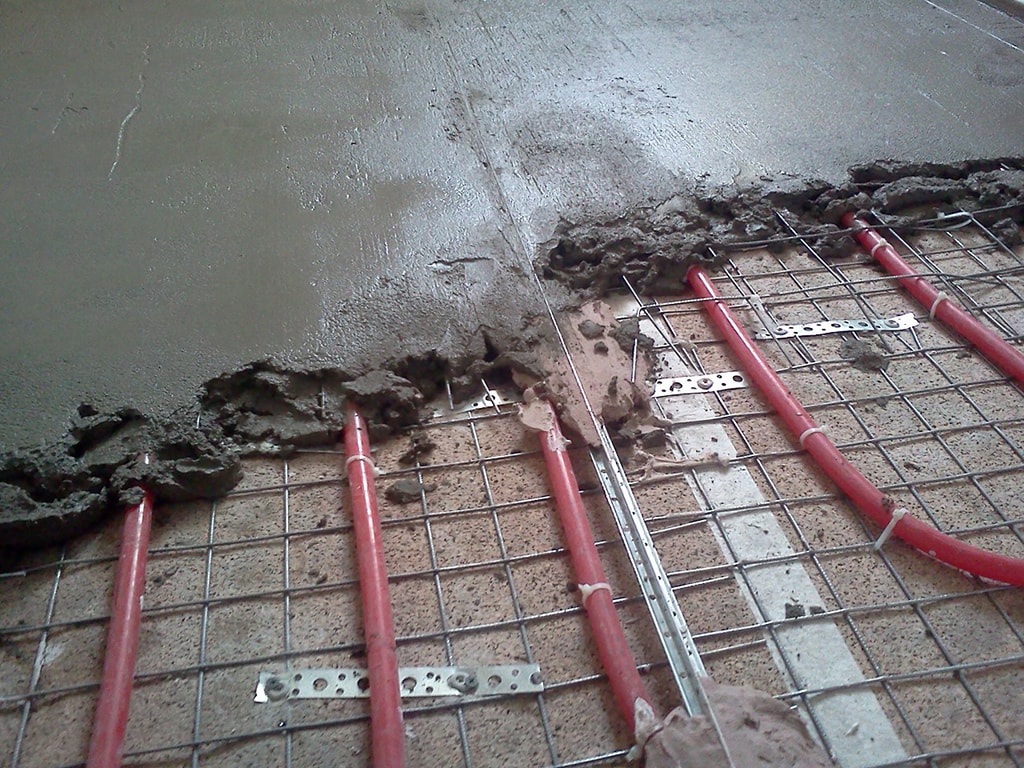
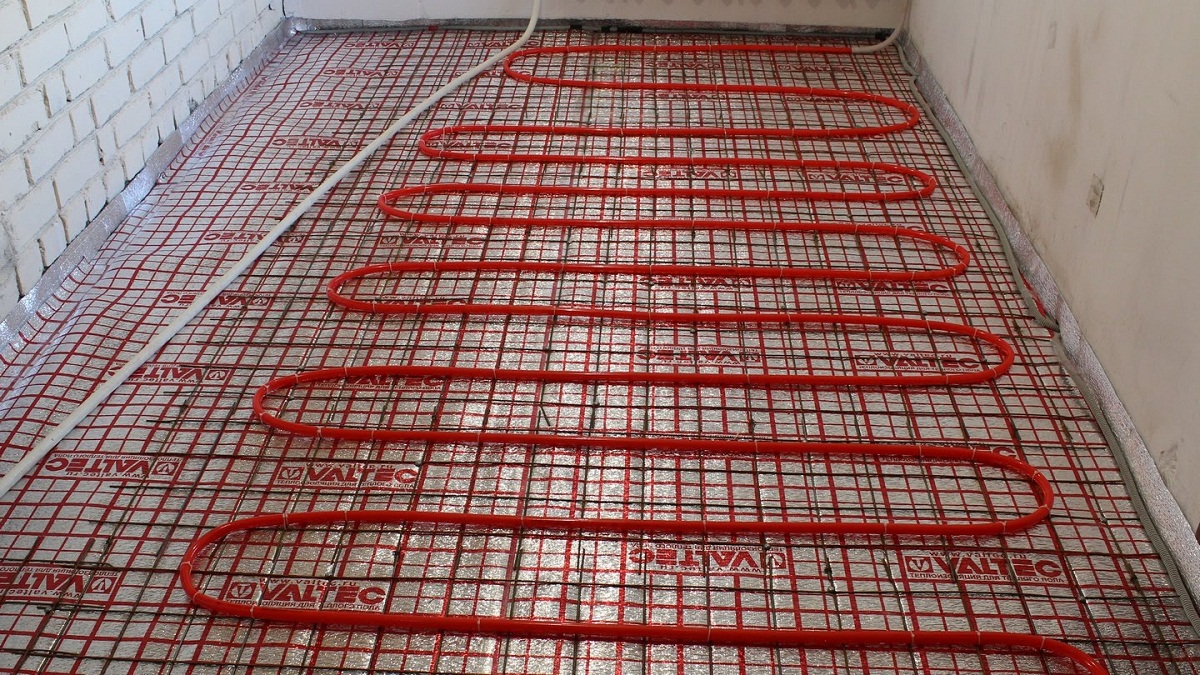
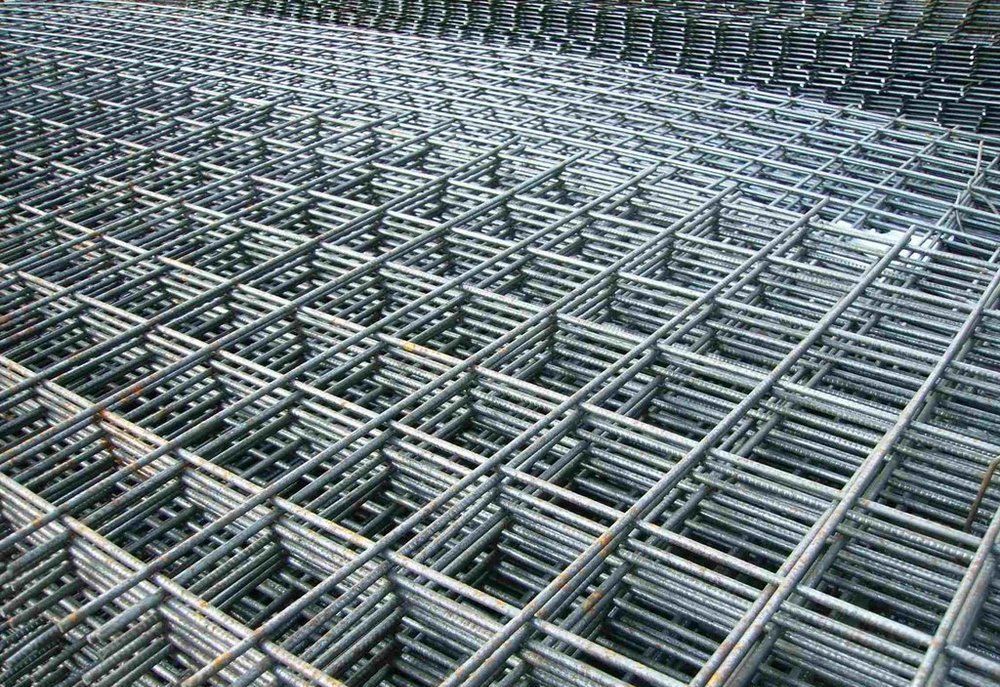
- Aluminum mesh for reinforcement - strengthens the supporting structure.
- Pipes.
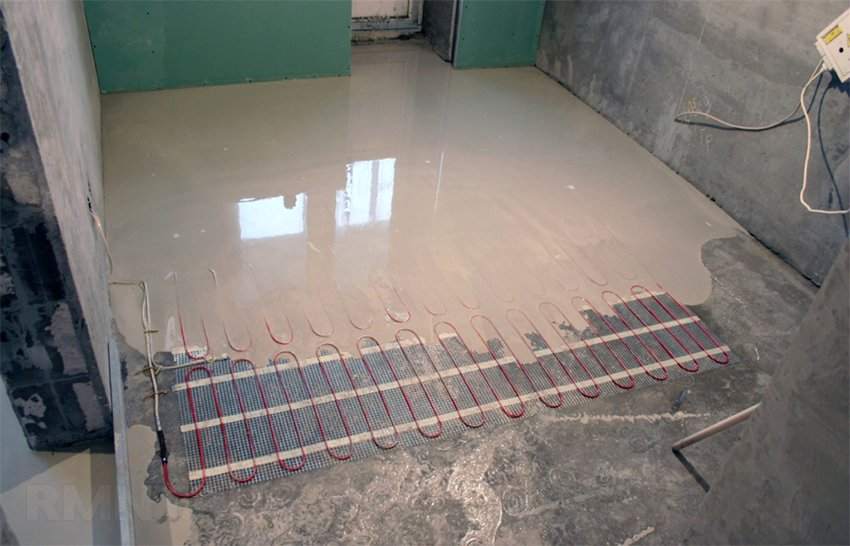
- Concrete screed.
- Finishing flooring.
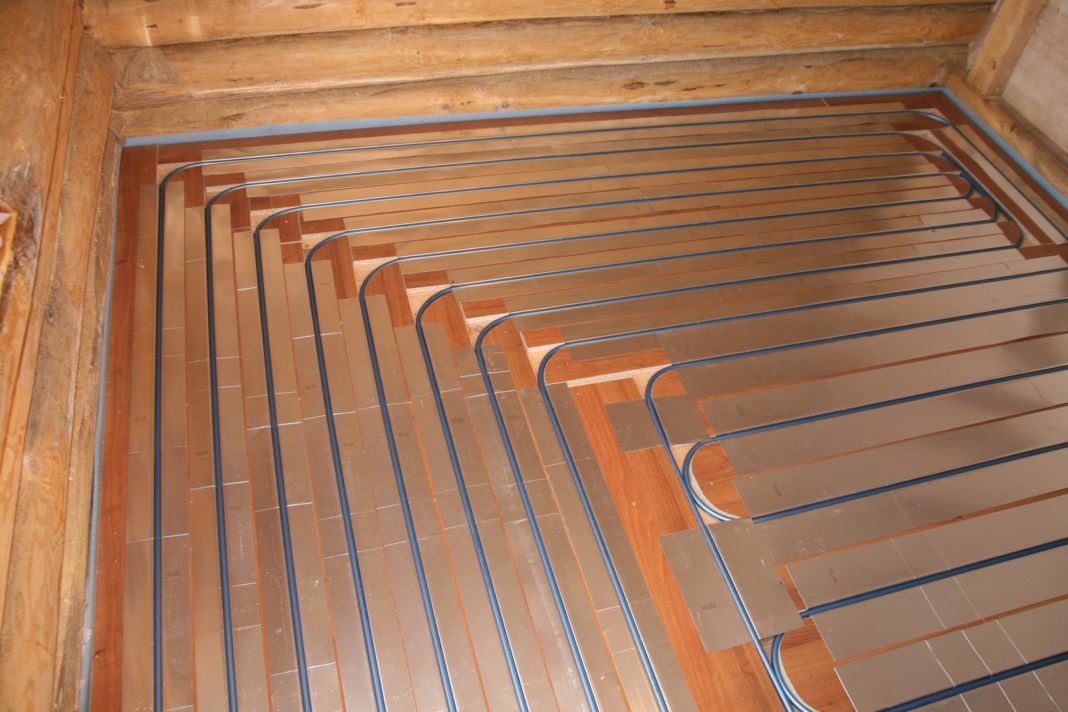
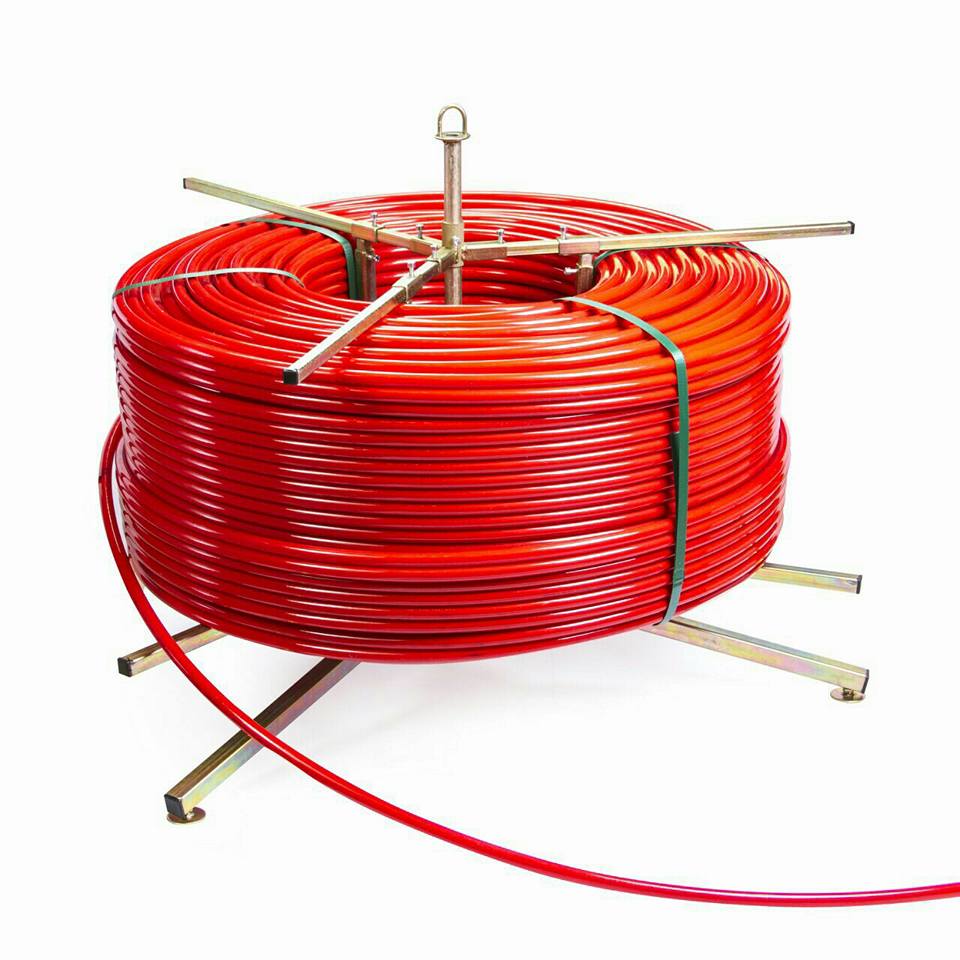
For laying a warm floor, pipes made from the following materials are used:
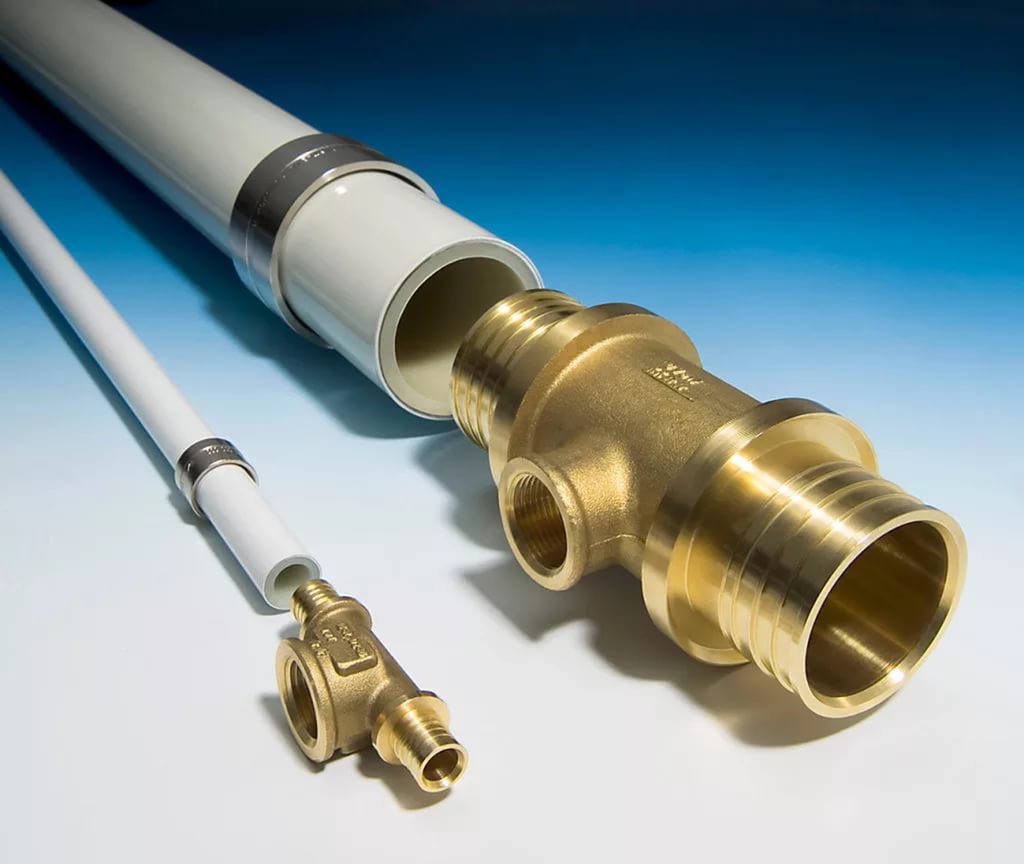
Metal plastic
Inexpensive version of the pipe, characterized by good heat conductivity, ease of connection and resistance to rust.
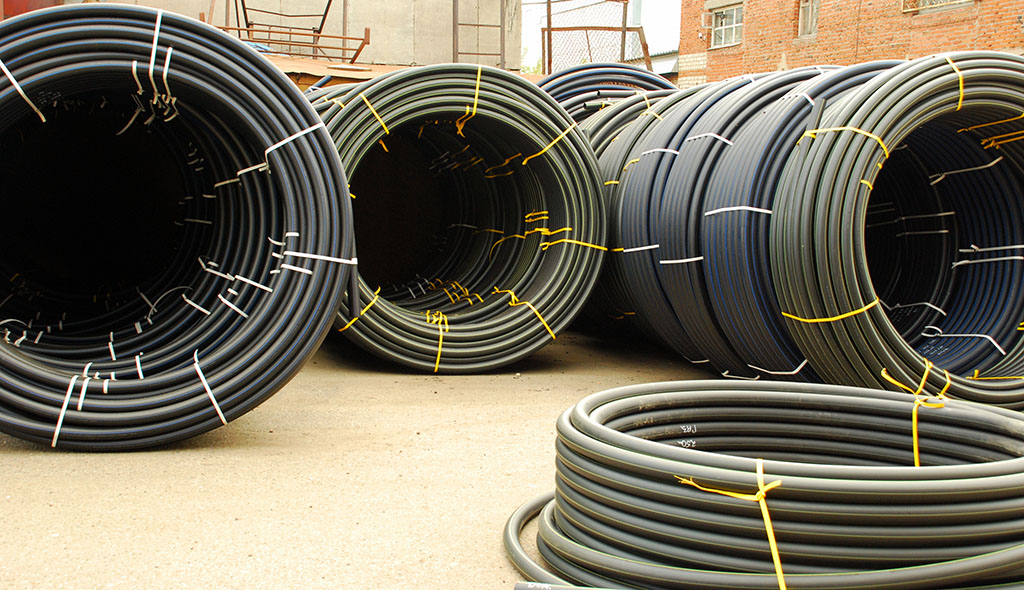
Polyethylene
Available and flexible conductors with good heat dissipation, the only negative of which is the need for additional fixation.
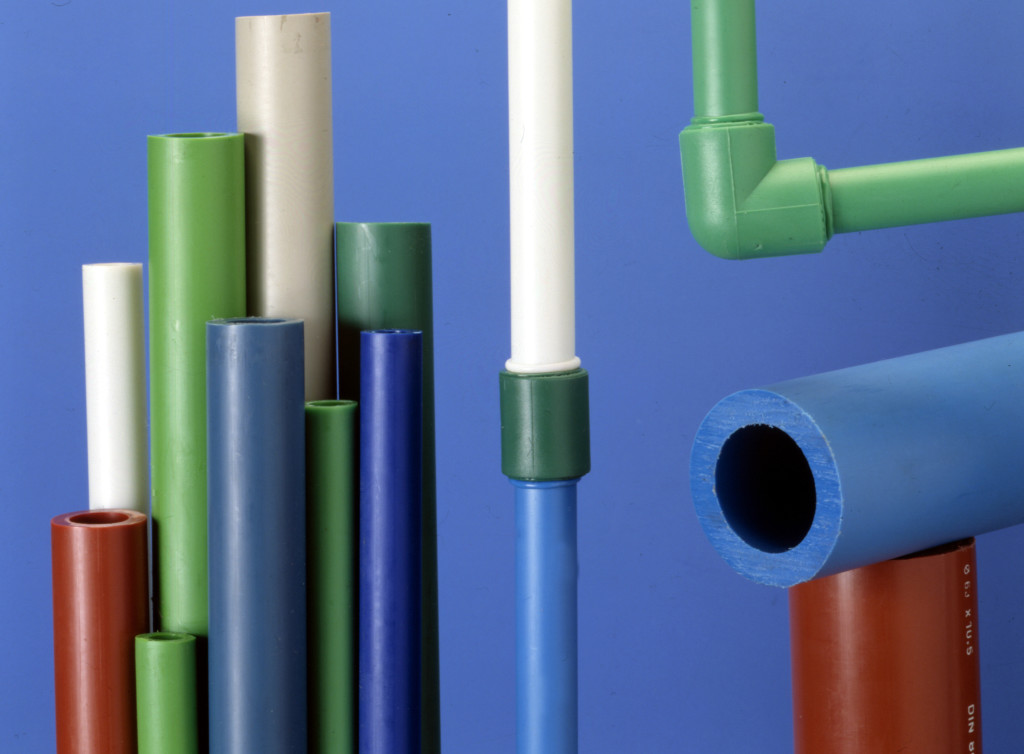
Polypropylene
The use of such pipes is not the best idea, since they are not plastic enough.
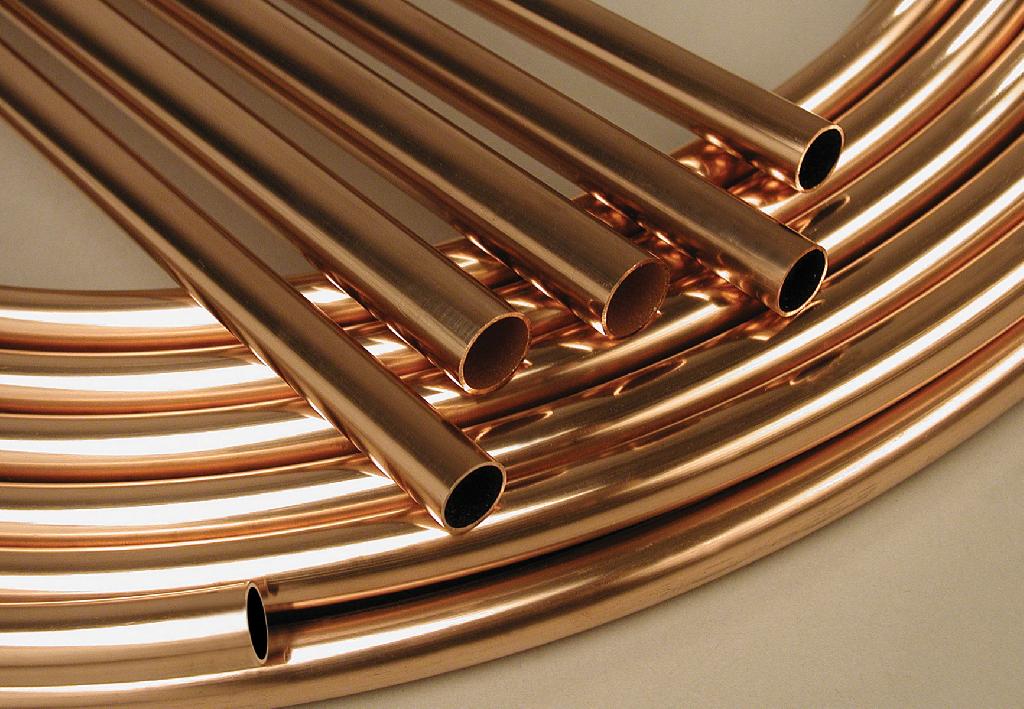
Copper
The most suitable and durable type of contours. However, not the most popular because of the high price and labor-intensive installation.
Styling methods
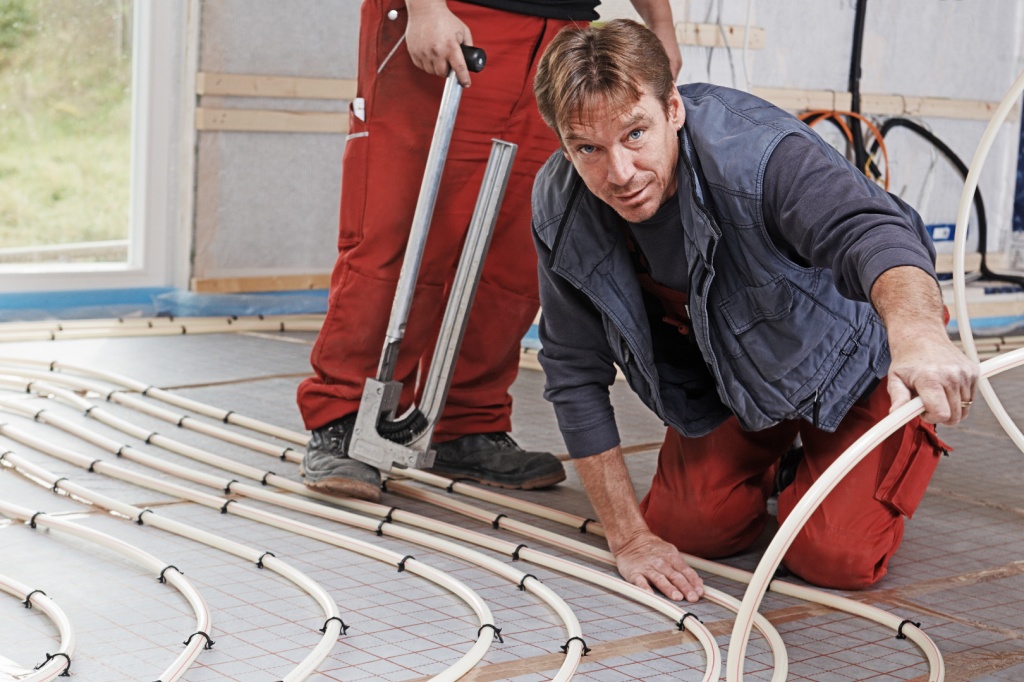
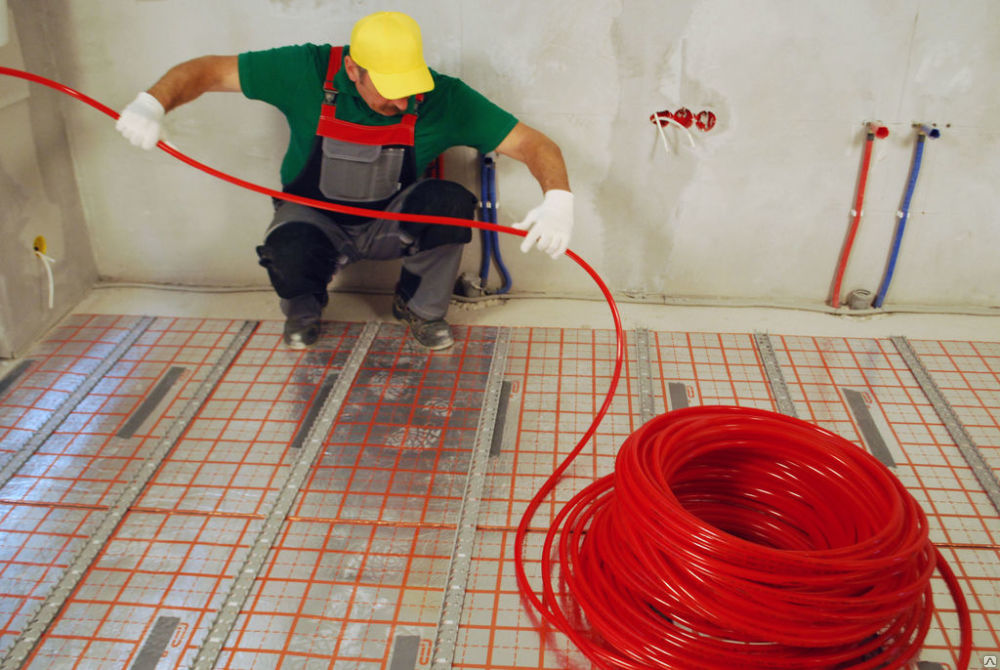
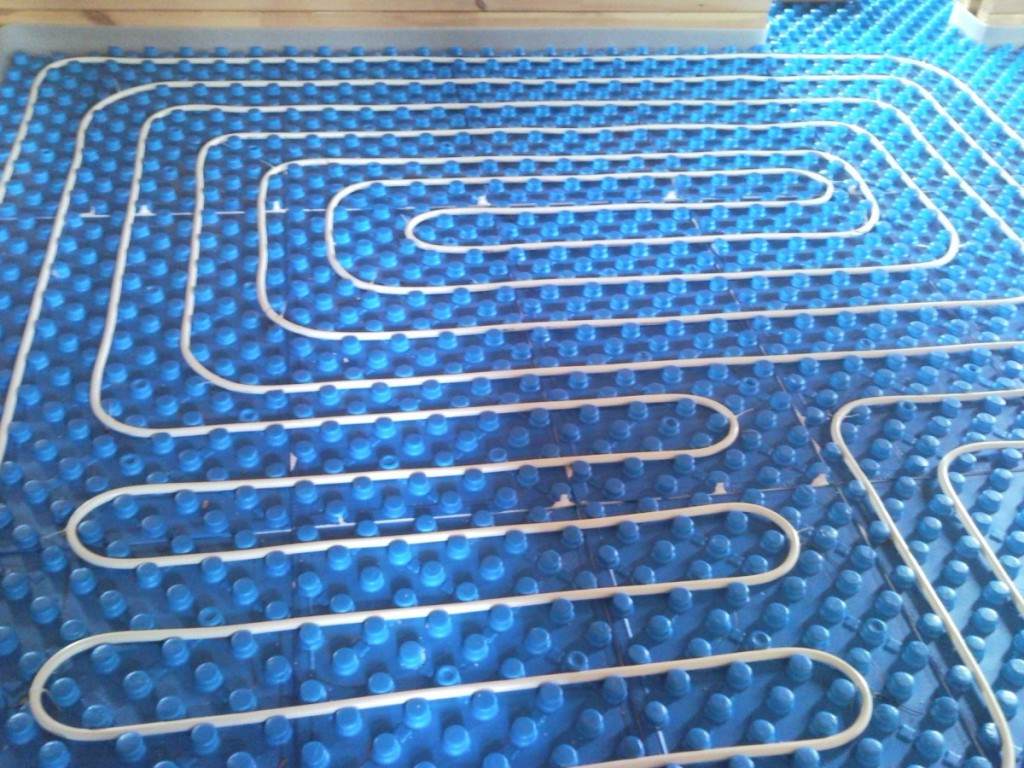
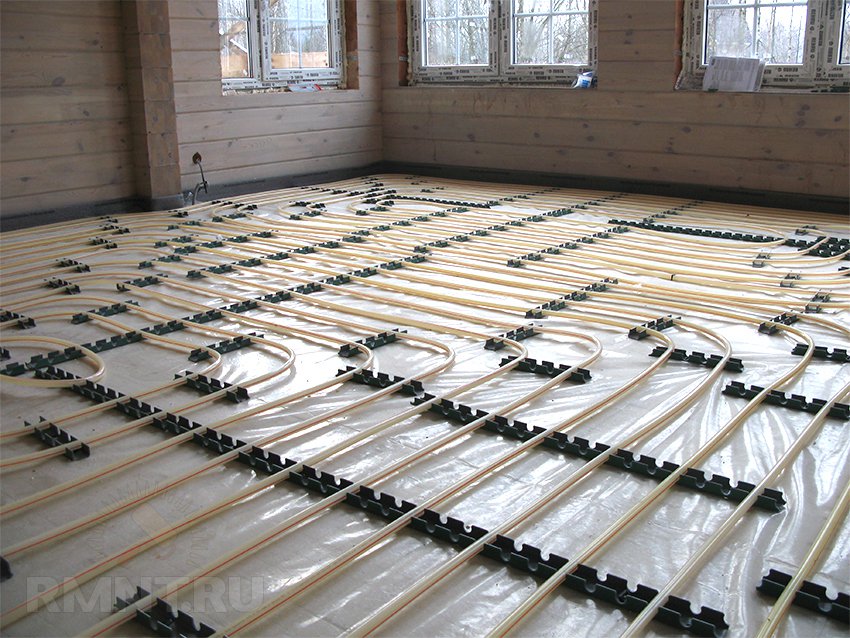
In order to correctly lay a warm floor, you need to carefully and strictly follow the technological instructions and recommendations. Direct laying should begin by connecting the cut pipe to the control unit. Further, the highway is located according to the chosen scheme, in a solid way, without additional connections (the principle of one-pipe heating system).
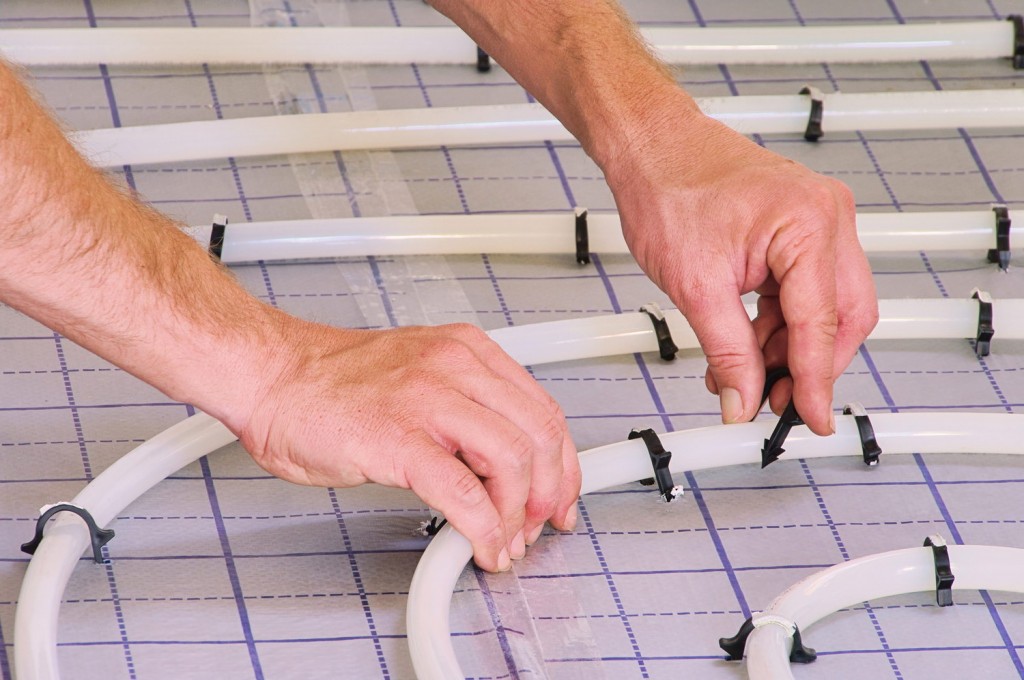
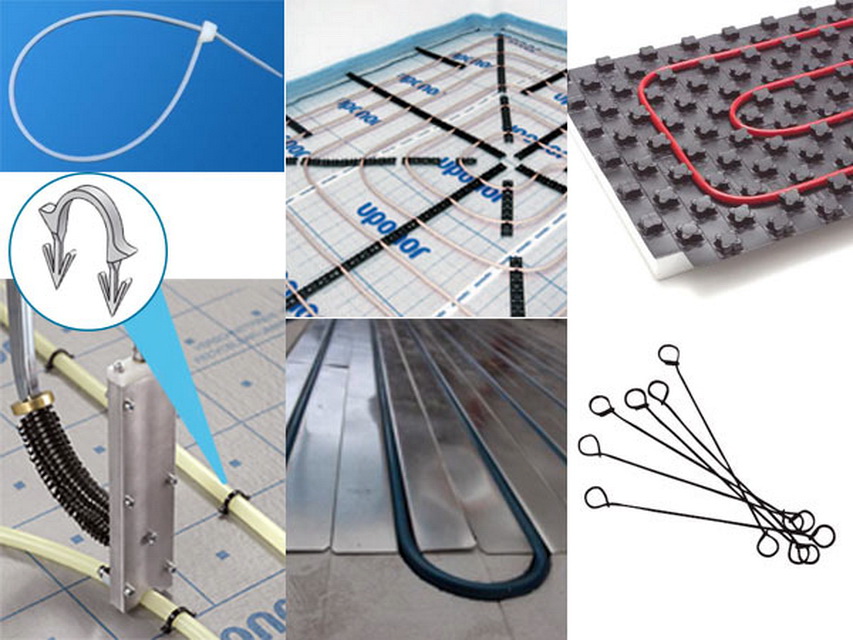
In order to distribute the total load correctly over the entire length of the line, and the contours do not move, you need to choose the optimal type of pipe fastening to the base.
There are such ways:
- wire to the reinforced mesh;
- fastening tape to the insulation layer;
- construction clip.

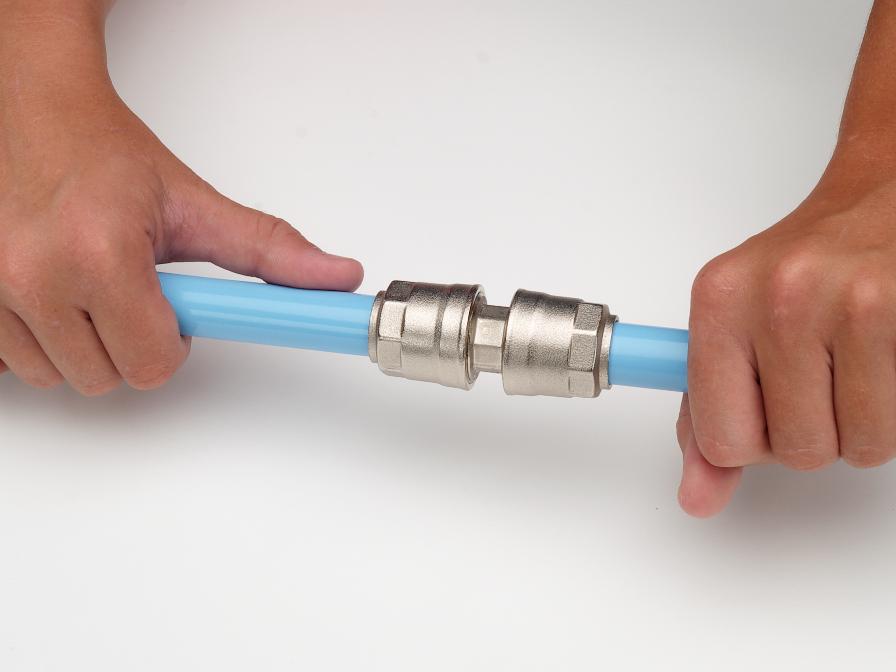
The laid and fixed pipeline must be connected to the collector. The connection is made by connecting the free end of the pipe to the regulating device.
Next is a pressure test, that is, testing for the presence of faults in the system. In the first stage, under significantly increased pressure (0.7 MPa) hot water is launched into the pipeline. For the collector is set the most effective program. Tests are conducted within half an hour. During this time, the water pressure should not decrease by more than 0.07 MPa. The second stage of crimping lasts at least a couple of hours, but under low pressure (1 MPa). As a result of the audit, this indicator should not fall by more than 0.025 MPa.
Having received positive test results, you can start pouring the screed with concrete, where it is recommended to add sand to increase the thickness.
Laying scheme
Installation of water supply system for a warm water floor is carried out in one of the following ways:
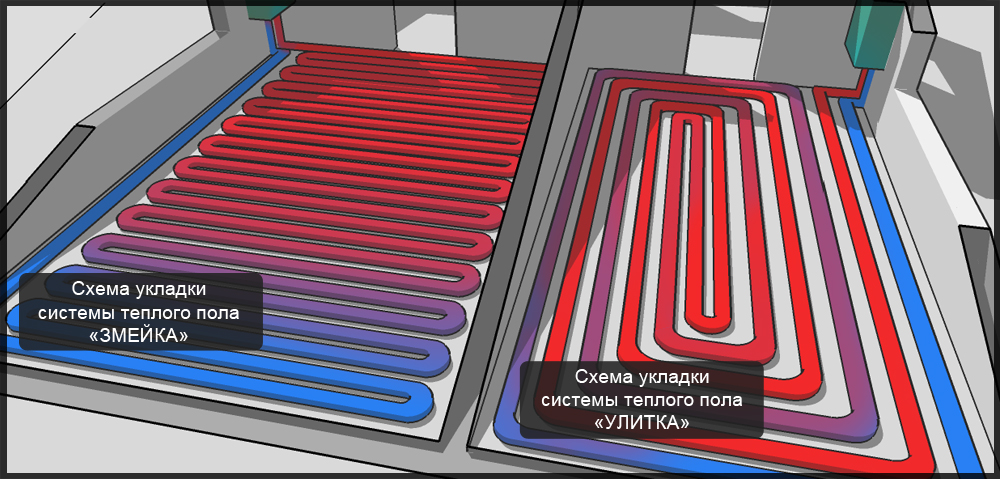
Classic "snail"
It is a spiral in which hot and cold contours run parallel to each other, evenly distributing heat on the surface.
This layout has several undeniable advantages:
- low hydraulic resistance;
- smoothness of angular bending;
- possibility of saving material.
The disadvantages include:
- the complexity of the project;
- the complexity of the installation.

"Snake"
Under this generic name are three types of schemes.
A simple "snake" - suitable for rooms, divided into zones, because it implies a difference in temperature in different sections of the pipeline. The primary coil of the system is surrounded by two sides of the room and then goes into a snake, in the upper part of which hot water circulates, and in the lower part - cold water.
Double "snake" - the circulation of hot and cold water is distributed between the two circuits, and the temperature difference is not felt so clearly.

Corner "snake" - used for corner rooms, two adjacent walls that face the street.
Advantages of the scheme:
- ease of design;
- ease of installation.
The disadvantages are also obvious:
- temperature difference within one plane;
- structural breakage due to excessive bending of propylene pipes.

Combined method
It implies the use of flexible schemes depending on the shape and type of room to be equipped.
Pluses of the mixed type:
- universality of use;
- uniformity of radiated heat.
The main disadvantage is the need to obtain special permits for installation.
After studying in detail each scheme, we can conclude that the "snail" is more suitable for square and round rooms, where there is a constant temperature regime. "Snake" is designed for long rectangular rooms in which the allocation of several zones is expected.
Having chosen the most suitable laying scheme, you need to go directly to its implementation. That is, to perform calculations, purchase material, lay the pipeline in accordance with a given shape on top of the insulation (polystyrene foam and film) and, using special brackets, connect the circuit to the reinforcing mesh under the screed.
Calculation of the minimum distance
After choosing the material and solving theoretical issues, the time of calculations comes. First you need to determine the required number of pipes.This can be done by following the algorithm.
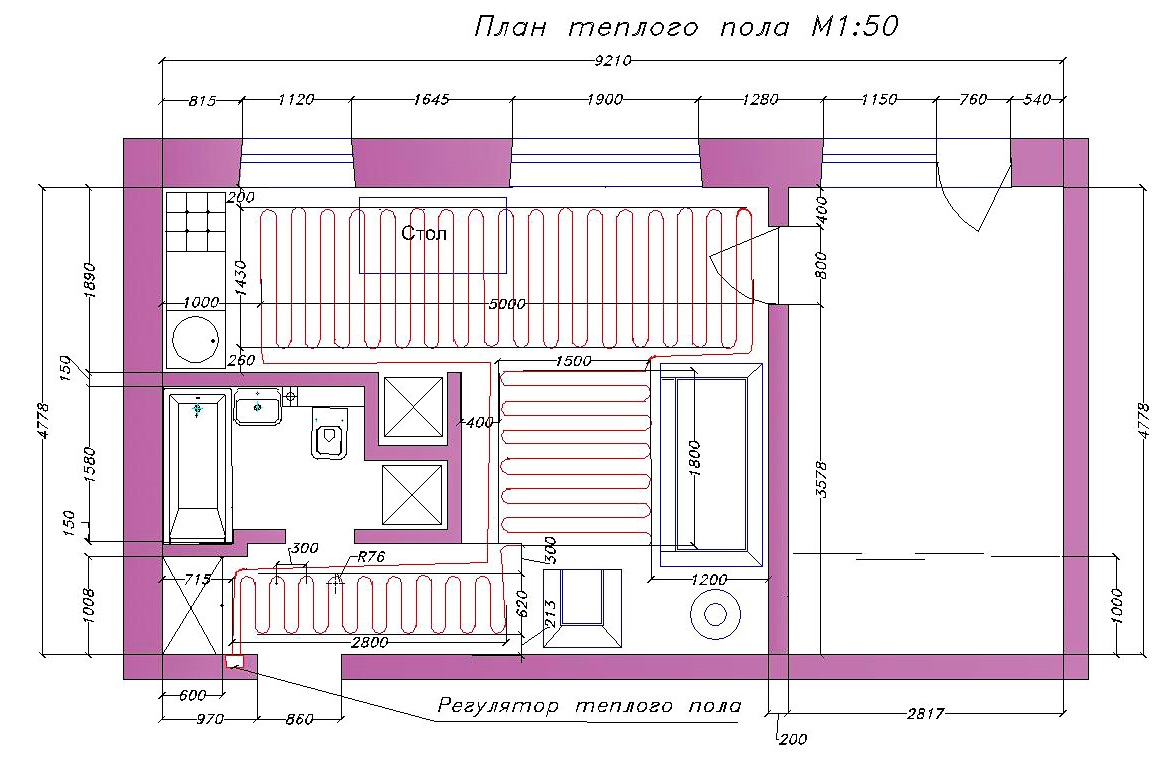
Draw on graph paper a detailed plan of the room where the heating system will be laid. It is important to strictly observe the scale. Mark on the drawing space, occupied by furniture and appliances, as under them the pipeline will not be located.
Select the contouring scheme
- It is much easier to lay the pipe "snake", but do not forget about the "zoning" feature of this scheme.
- The “snail” layout (spiral) is more laborious and takes more time, but it will ensure even heat delivery to the room.
If none of these options fits into the size of the room, you need to use a universal scheme.
- Apply the selected pattern to the drawing.
Measure the total length of the contours and multiply the resulting figure by the scale factor. For example, the total length of a pipeline in a drawing with a scale of 1: 20 was 50 cm. To get a real number, you need to multiply the length indicator by 20, that is, by the number of times the drawing is reduced.
The next step is to determine the distance between the contours of the heated floor (pitch).When calculating, it is important to take into account the inverse relationship between the laying step and the general climate of the room: the cooler the room, the wider the contours need to be laid out in order to increase the heating density.
The distance between the pipes also depends on their diameter. For this indicator a few average values are calculated. They are the most convenient to use in practice.
Minimum laying step for pipes:
- 10-15 cm - with a diameter of 16 mm;
- 15-20 cm - with a diameter of 20 mm;
- 20-30 cm - with a diameter of 25 mm or more.
After completing the basic calculations, it is necessary to determine the required quantity and purchase additional consumables:
- insulation for thermal insulation - foam mats or mineral wool;
- waterproofing film - a wide range of high-quality polyethylene coatings is on the market;
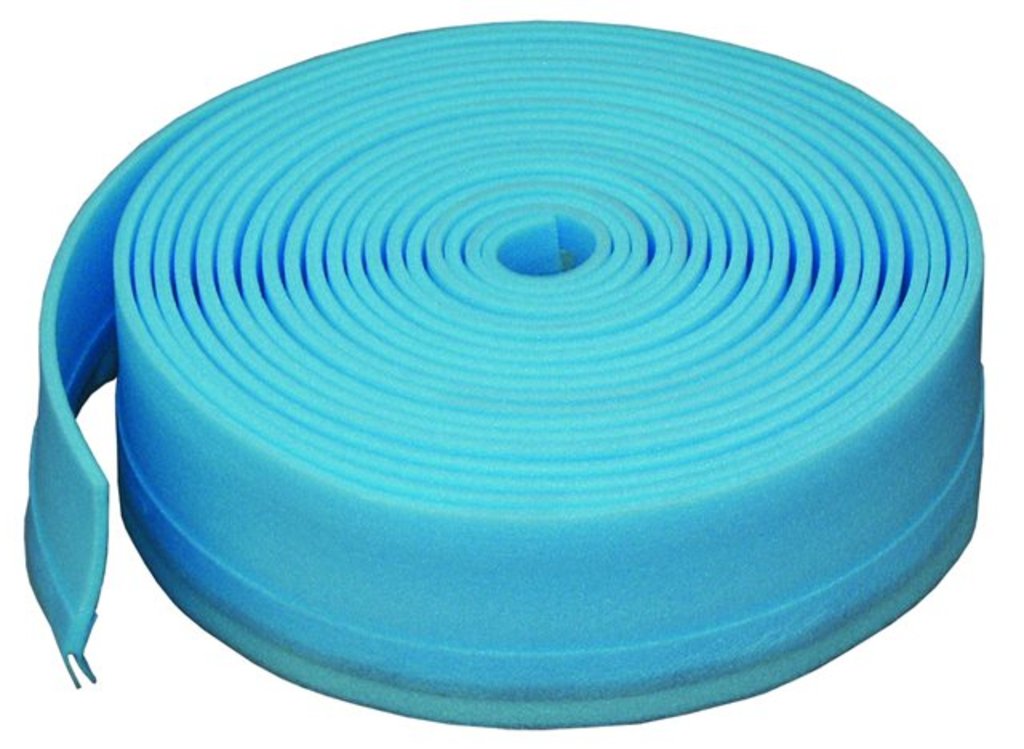
- damper tape - a kind of backup seal used to better secure the tie;
- reinforcing mesh with medium cells;
- a set of fasteners - special clamps or clamps that allow you to securely attach the contours.
You will also need a collector, auxiliary collector sensors (as needed), a collector mixer, fittings, and a final covering - carpet, laminate, linoleum or tile (depending on individual preferences).

You should also purchase the tool:
- decoiler - a device for unwinding rolls of insulation, film or reinforced mesh;
- pipe cutter - is selected taking into account the pipe material;
- drill;
- screwdriver;
- soldering iron;
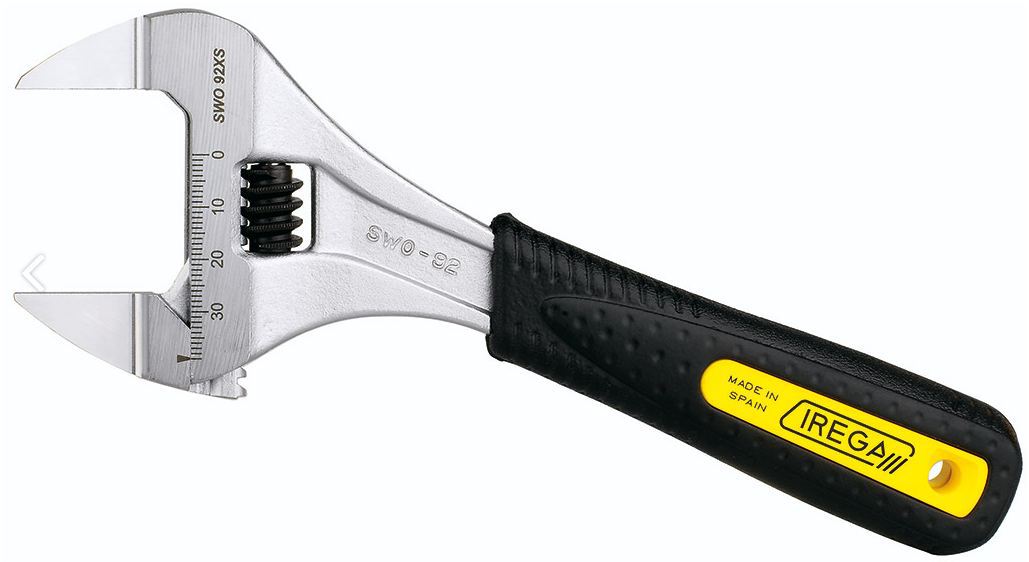
- Wrench (preferably adjustable).


After the materials and tools are purchased, you can proceed to the direct installation of the structure. Successful laying contours of the floor depends on compliance with instructions and recommendations. However, you need to take into account some construction subtleties that allow you to perform work more efficiently.
Nuances of installation of a heat-insulated floor
Laying a water floor system with your own hands is not difficult.
The main thing is to follow the technology carefully:
- dismantle the old flooring;
- if necessary, restore the ceiling or fill the inner screed;
- to warm the base and fix the heat insulation layer with a damper tape;
- cover the surface with a waterproofing film and fix it with a wide adhesive tape;
- put reinforcement;
- install a collector and connect a pipe to it;
- to lay the pipeline according to the chosen scheme, strictly observing the calculated step of laying;
- fix the contours using a special mount;
- fully connect and test the heating system;
- if done correctly, pour the screed with concrete;
- apply a decorative coating.
Installation does not take much time (except for the drying time of the screed). The above algorithm is absolutely universal and accessible to everyone.
However, there are a number of nuances:
- The laying step varies depending on the stiffness of the pipe. Accordingly, for plastic polyethylene and metal-plastic constructions it is smaller than for solid propylene and copper.
- To make the pipeline safer, it can be strengthened with screws that are screwed into the base.
- To avoid leakage, it is necessary, if possible, to minimize the number of joints and strengthen the joint with a bench fit.
- If the contours intersect with the damper tape in overlap, then these places need to be reinforced with a protective sleeve.
- It is more rational to flood the lighthouses. Then the base under the decorative floor will be much smoother.
- Collectors and sensors are installed depending on the type of accommodation. In the apartments, a special wall niche is adapted for them.In private homes, thermostats are displayed in the basements.
Useful tips
You should not lay out the line wider than 6 meters. Otherwise, the water in the pipes will cool down quickly, and the air temperature will drop. In spacious rooms and halls, it is better to pre-divide the area of the heated surface into equal sectors and fill them with separate heating circuits.
If you decide to lay out your warm floor with plastic products, give preference to seamless varieties. To optimize heat distribution, you can vary the pitch of the circuits within one heating system.
For safety reasons, it is recommended to keep a distance of at least 10 cm between the walls and the heating line. The waterproofing can be installed not only with film, but also in the form of a bituminous screed.
In order to avoid the expansion of the concrete layer under the influence of temperature, professionals advise to add a special plasticizer to the raw mortar. You should not save on consumables, tools and components, because, acquiring them, you make a contribution to your comfort.
On the intricacies of installing underfloor heating you can see in the next video.